You open a panel, look at the raceway terminations, and realize the conductors are already in. Big feeders. Tight bend space. Shutdown window is short, or maybe there isn't one. A standard grounding bushing would mean backing up the job and pulling wire just to get the fitting on. That's where a split grounding bushing stops being a throwaway line item and starts being a real field solution.
A lot of people treat these as a specialty version of a plastic throat bushing. That's not what they are. A split grounding bushing is a bonding fitting first, with conductor protection built into it. The split body lets you install it around existing conductors and over the raceway end without disturbing a completed pull. On retrofit work, service upgrades, troubleshooting, and inspection corrections, that design can save a lot of unnecessary labor.
What matters in the field is simple. You need the right fitting for the raceway, the right lug range for the bonding conductor, and the right listing for the application. If any one of those is wrong, the fitting may still go on, but it won't solve the inspection issue and it may not satisfy the installation requirement that drove the call in the first place.
Introduction to Split Grounding Bushings and Why They Matter
The classic split grounding bushing job goes like this. Feeders are already pulled into a switchboard or gutter. Someone catches that the raceway termination needs a bonding means and conductor protection at the enclosure entry. The solid one-piece bushing sitting in the gang box won't help unless the conductors come back out.
That's why the split design exists.
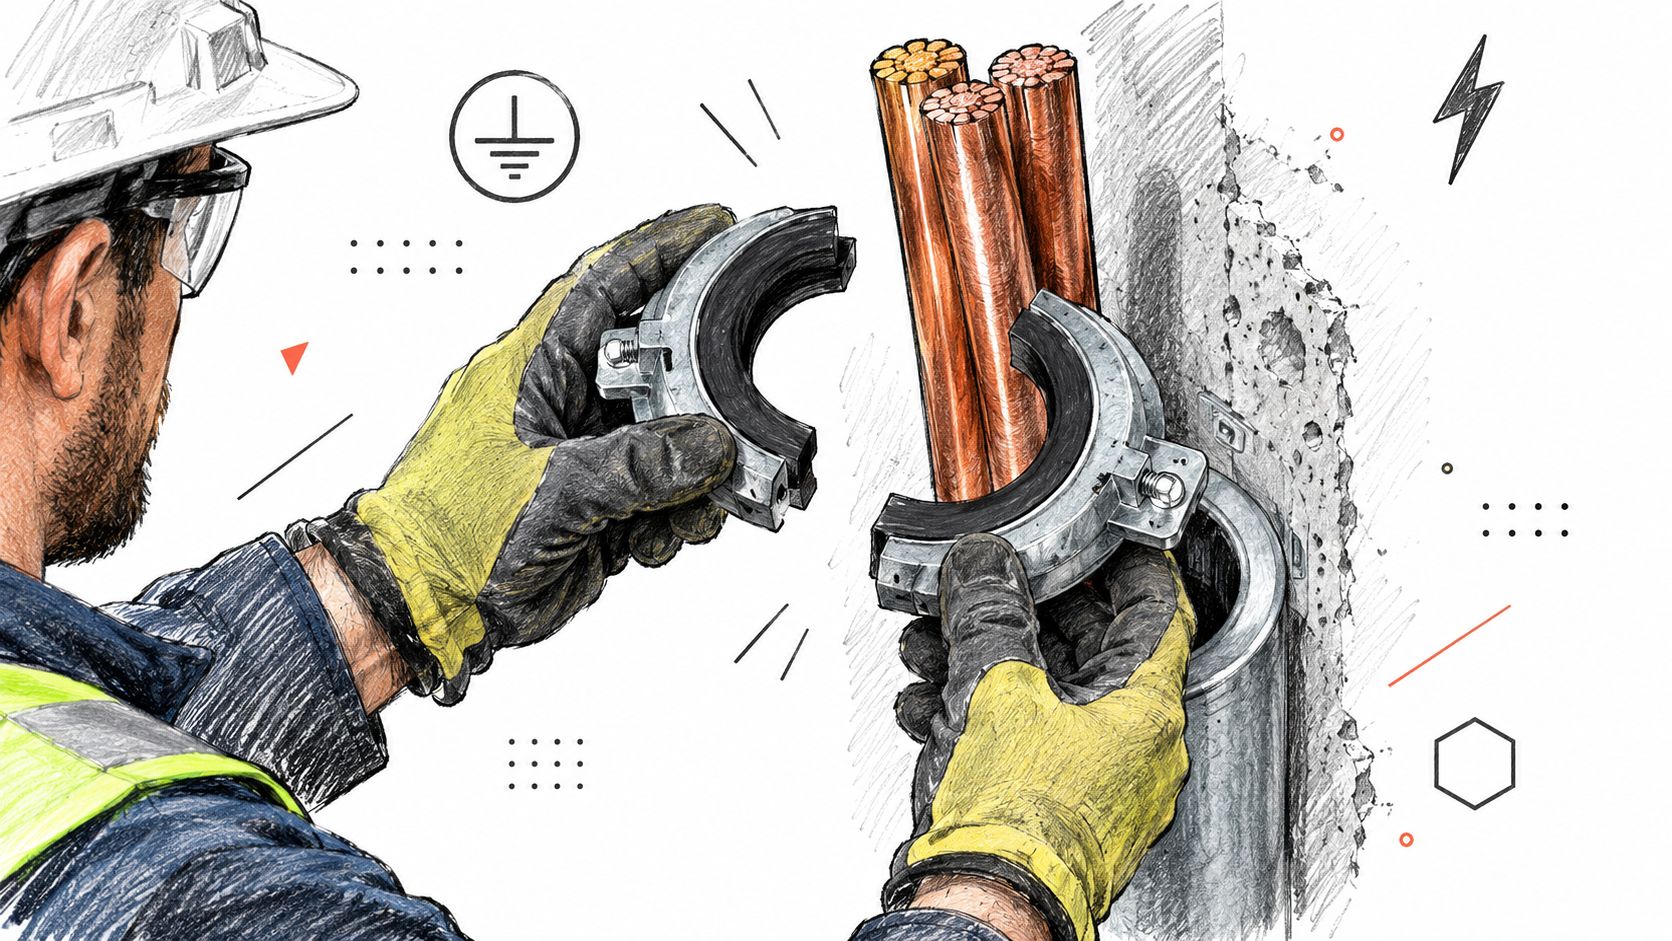
A split grounding bushing is built to go on after the pull. The body separates so it can fit around existing conductors, then closes onto the raceway end. It gives you an insulated throat at the conduit opening and a lug for the bonding connection. That combination is what makes it useful on service raceways, large feeders, gear replacements, and correction work after an inspector calls out the termination.
Why the split feature matters in the real world
On new construction, if the raceway is empty, a standard solid grounding bushing may be fine. On retrofit work, it often isn't practical. Nobody wants to disturb an existing pull if they can avoid it. Large conductors don't slide out and back in like branch circuit wire. You're dealing with pulling tension, wire makeup, termination space, and schedule risk.
Field reality: The value of a split grounding bushing isn't the part itself. It's the pull you don't have to redo.
The people who benefit most are the ones who get handed these problems late in the job. Contractors doing service work. Maintenance teams working in occupied facilities. Specifiers and purchasing teams trying to keep submittals clean before material lands on site. If you're buying or installing for service entrances, transformer secondary feeders, panelboard replacements, or switchgear retrofits, this fitting deserves more attention than it usually gets.
What a Split Grounding Bushing Does for Bonding and Protection
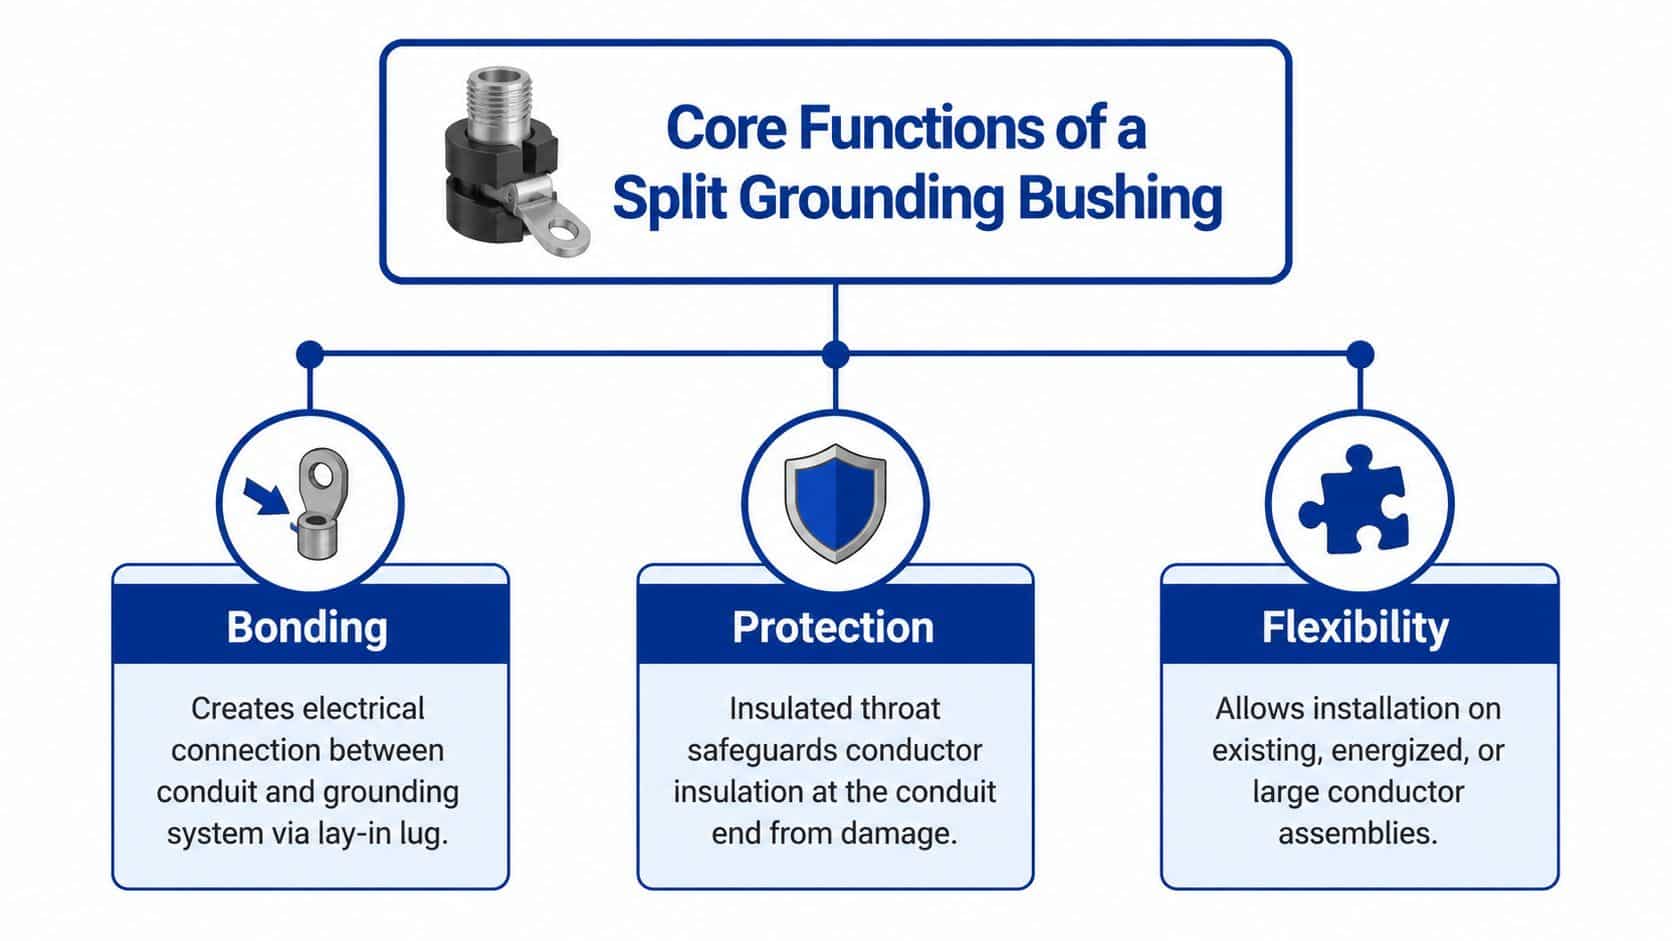
A split grounding bushing does three jobs at once. It protects conductor insulation at the raceway end, it gives you a means to bond the raceway, and it solves installations where a one-piece fitting can't be installed after conductors are already in place.
It is bonding equipment, not just a wire protector
This is the first thing that gets missed. The insulated throat matters, but the fitting's real purpose is bonding continuity. The lug on the bushing lets you land a bonding jumper so the metallic raceway is tied into the grounding and bonding path the way the installation requires.
That's why it helps to think of this fitting as part of the raceway bonding assembly, not as a comfort accessory for the conductors. If you're dealing with metallic conduit entries at service equipment, switchboards, panelboards, or similar enclosures, that distinction matters.
Bridgeport's installation literature ties this type of product to UL 514B and UL 467 for threaded RMC and IMC fittings and references NEC Articles 250.64, 250.92, 344.46, and 300.4(G), including applications involving conductors 4 AWG or larger in certain setups, as shown in the Bridgeport grounding bushing installation manual.
The three practical functions
Bonding the raceway: The lug accepts the bonding conductor so the raceway termination isn't relying on questionable metal-to-metal contact alone where a positive bonding means is expected.
Protecting the insulation: The insulated throat separates conductor insulation from the conduit edge at the point of entry.
Handling retrofit conditions: The split body installs around existing conductors, which is the whole reason people ask for this fitting in the first place.
For related enclosure and accessory categories that often get ordered alongside these fittings, it helps to review broader electrical boxes and accessories when you're matching raceway terminations to cabinets, pull boxes, or equipment housings.
A split grounding bushing earns its keep when the conduit is already terminated, the conductors are already landed, and the only bad option is pulling everything back out.
What failure looks like without one
In the field, the problem usually shows up one of two ways. Either the conductor jacket is bearing against a rough raceway edge, or the raceway bonding path at the enclosure entry isn't being accepted as installed. Both problems tend to surface late, when the gear is set and the conductors are already where they need to stay.
That's why these fittings show up so often on punch lists and service corrections. They solve two issues at the same location with one listed fitting, provided the trade size and lug range are right.
Split Versus Solid Grounding Bushings and When to Choose Each
Most ordering mistakes happen because somebody chooses by appearance instead of job condition. Split and solid grounding bushings do the same broad job, but they do not fit the same installation sequence.
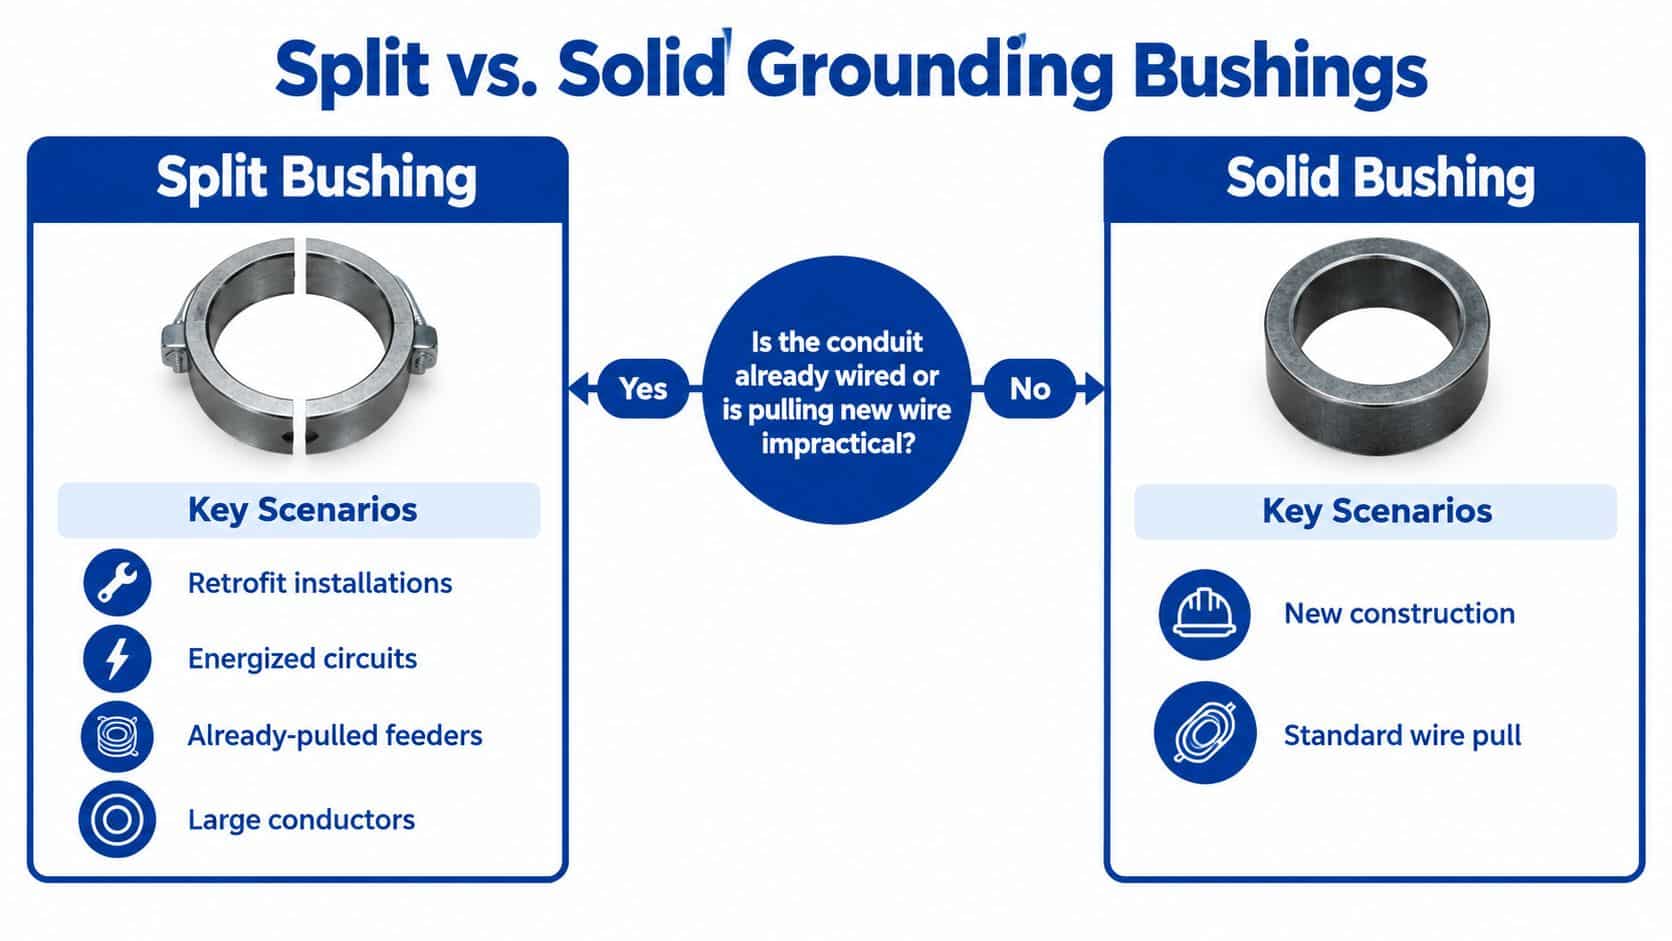
If the conduit is empty and you're still in rough-in or early trim, a solid grounding bushing is usually the straightforward choice. If the conductors are already pulled, terminated, or difficult to remove, the split style is usually the one that saves the day.
The basic rule for choosing
Use a split grounding bushing when:
conductors are already installed
shutting down and disconnecting is a problem
the feeder pull would be expensive or risky to disturb
the work is corrective, retrofit, or tied to an inspection deficiency
Use a solid grounding bushing when:
the raceway is not yet wired
you can install the fitting before the pull
it's standard new construction with no access problem
there's no need for post-pull installation
Split vs Solid Grounding Bushing Decision Matrix
Condition
Split Bushing
Solid Bushing
Existing feeders already in conduit
Best fit
Usually impractical
New construction before conductors are pulled
Acceptable, but often unnecessary
Best fit
Service correction after failed inspection
Strong choice
Often requires rework
Large conductors with limited slack
Strong choice
Often difficult
Quick replacement without disturbing terminations
Best fit
Weak fit
The trade-offs nobody should ignore
Split bushings solve access problems, but they also demand more attention at ordering. You need to confirm that the split design matches the raceway type, trade size, and conductor situation. Installers also need to make sure the two-piece body seats correctly and the insulated throat is doing its job all the way around the conductor entry.
Solid bushings are simpler when the install sequence is clean. Fewer moving parts. Less chance of someone ordering the wrong retrofit style for a straightforward rough-in. But once the conductors are in, that simplicity disappears fast.
Practical rule: Don't buy a split grounding bushing just because it sounds more versatile. Buy it because the installation sequence requires it.
From a distributor side, many submittal errors start here. People assume “grounding bushing” is specific enough. It isn't. You need to call out split or solid, raceway type, trade size, and lug range. If the buyer leaves any of that vague, the field crew may get a perfectly good fitting that still can't be installed.
Anatomy and Materials of a Split Grounding Bushing
A split grounding bushing looks simple until you compare submittals side by side. Then you see where quality and compatibility live. Body material, insulator rating, lug alloy, and hardware all matter because this fitting is doing both mechanical and electrical work at a raceway termination.
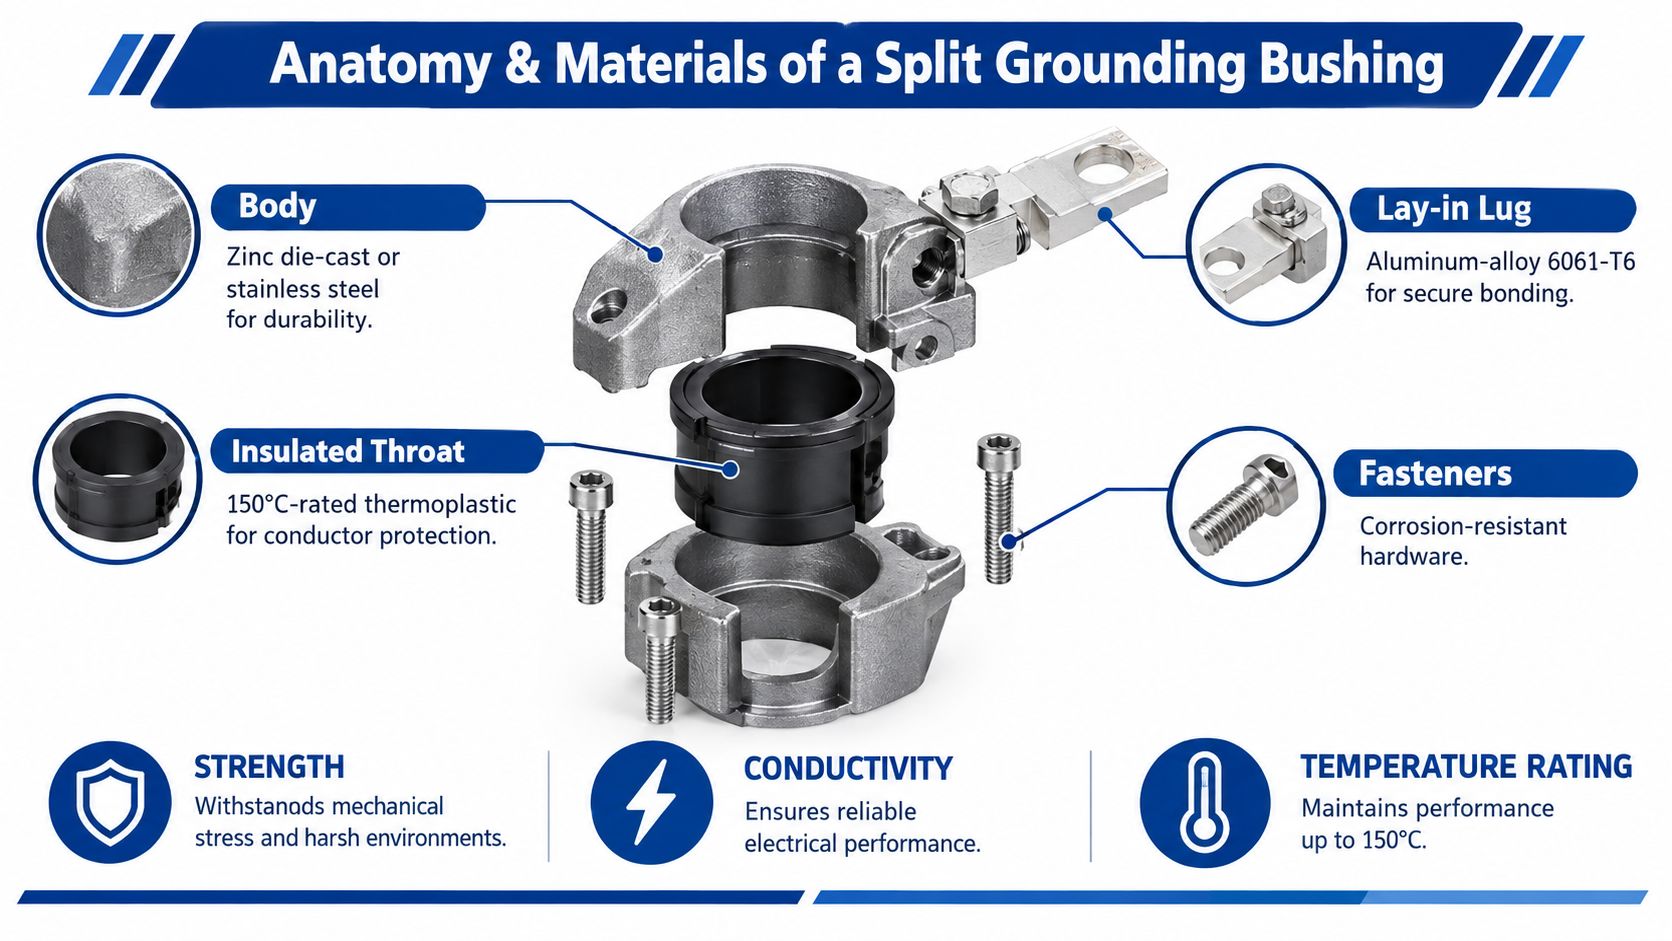
Seattle City Light's field standard is useful here because it spells out what a split-type grounding insulated throat bushing is expected to include. It identifies the split type as non-threaded, with zinc die-cast or stainless-steel construction, an aluminum-alloy 6061-T6 grounding lug, and a 150°C-rated thermoplastic insulator, with a grounding wire range of #6 AWG to 3/0 in that standard, as shown in the Seattle City Light grounding bushing standard.
What each piece is doing
The body gives the fitting its clamp strength and physical durability. Zinc die-cast is common and practical for many indoor and general applications. Stainless-steel versions make sense where corrosion exposure is more of a concern.
The insulated throat protects conductor insulation where it enters the enclosure through the raceway. The rating matters because this part sits right at the contact point that can otherwise scar insulation during installation or over time.
The lay-in lug is where the bonding conductor lands. On split designs, this part matters as much as the body. If the lug range doesn't match the conductor you need to terminate, the fitting is wrong even if the raceway size is correct.
What to look for in submittals and stock descriptions
Body construction: Check whether the body is zinc die-cast or stainless steel, and whether that matches the environment.
Insulator material: Confirm the throat is insulated and rated as specified for the application.
Lug construction: Verify the lug material and conductor range before release.
Mounting style: Don't assume all grounding bushings are threaded. Split types are often selected specifically because they clamp on after the pull.
For buyers comparing rigid and IMC fitting families, this is also where it helps to look at broader rigid and IMC conduit fittings so the bushing choice stays aligned with the rest of the raceway package.
A cheap listing description that only says “grounding bushing” is not enough. If the material, lug, and split-body details aren't clear, ask before it ships.
Compatibility Guide for Conduit Types and Trade Sizes
Compatibility is where these fittings either solve the problem or create a second one. A split grounding bushing can be exactly what the job needs, but only if it matches the raceway and the bonding conductor you're using.
Start with raceway type, not catalog habit
The first check is whether the fitting is intended for the conduit system on the job. Manufacturer literature commonly ties split grounding bushings to threaded RMC or IMC applications. That matters because many crews casually say “conduit” and leave it at that. In purchasing, that shortcut causes misses.
If you're working in an environment that uses multiple raceway systems, don't assume a bushing selected for rigid or IMC crosses over to every other fitting family. For raceway package review, some buyers also compare adjacent product categories such as EMT conduit fittings so they don't mix hardware across systems.
Check trade size and lug range together
A common mistake is matching the raceway size and forgetting the grounding conductor range at the lug. That's how you end up with a bushing that physically fits the conduit but won't accept the bonding conductor you planned to land.
Seattle City Light's standard gives a clear example of a split type with a lug range of #6 AWG to 3/0. That doesn't mean every product on the market uses that same range. It means you should treat lug compatibility as a separate verification item every time.
Split Grounding Bushing Size and Wire Range Lookup
Trade Size
Conduit Type
Lug Wire Range
Match manufacturer listing
Threaded RMC
Verify by product submittal
Match manufacturer listing
Threaded IMC
Verify by product submittal
Larger feeder raceways
Threaded RMC or IMC
Confirm lug accepts planned bonding conductor
Service raceway terminations
Threaded RMC or IMC
Check conductor range before approval
Split type per field standard example
As specified by product standard
#6 AWG to 3/0
Practical selection cues from the field
For a smaller feeder raceway, the main concern is usually straightforward fit. For a larger service raceway, the question becomes whether the bushing will sit correctly at the conduit end, whether there's room around existing conductors, and whether the lug can be landed cleanly without crowding adjacent hardware.
When I review these for submittal support, I look for four things right away:
Exact trade size listed by the manufacturer
Conduit system compatibility stated plainly
Lug wire range shown in the product data
Listing references included in the cut sheet or installation sheet
The fastest way to create a field delay is to approve a split grounding bushing by trade size alone.
Also watch the termination area itself. Some enclosure entries are crowded enough that the lug orientation matters. A fitting may technically fit the conduit and still be awkward once the bonding conductor, locknut, and neighboring raceways are all in play. That's not a code issue. It's a jobsite reality issue.
Code and Application Reference for When Grounding Bushings Are Required
People either overstate the requirement or undersell it. The safe path is to stay tied to product listing and installation literature, then apply that to the actual raceway condition in front of you.
Where the standards fit
Split grounding bushings are not some off-book field fix. UL 467 formally covers grounding and bonding equipment, and the 2022 edition explicitly lists grounding bushings among the equipment it governs. The current edition is UL 467 Ed. 11-2022, published on November 1, 2022, as shown in the UL 467 standard listing.
That matters during submittal review because it confirms grounding bushings remain part of an actively maintained safety standard used for grounding systems and bonding equipment.
Where inspectors commonly expect to see them
Manufacturer installation literature is often the cleanest practical guide. The Bridgeport manual cited earlier references NEC Articles 250.64, 250.92, 344.46, and 300.4(G) and points to situations involving threaded RMC or IMC fittings, bonding requirements, and conductors 4 AWG or larger in certain setups. In practice, that puts these fittings in the conversation around:
service raceway terminations
switchgear and switchboard entries
panelboard and gutter terminations
transformer and distribution equipment enclosures
larger conductor entries where insulation protection is part of the requirement
What inspectors are usually checking
They're typically looking for a listed bonding means that fits the raceway method and the application. If the installation needs a grounding bushing, the inspector wants to see a fitting intended for that job, not a standard insulating bushing standing in for a bonding device.
They may also look at whether the bonding jumper is landed and whether the fitting used is consistent with the raceway type. A split grounding bushing can satisfy the installation condition well, but only if the product is listed and installed as part of the bonding path, not just snapped in place as edge protection.
If the raceway termination needs bonding continuity and conductor protection, a plain insulated throat by itself may not answer the callout.
For service equipment and larger feeder work, this is why listing language belongs in the submittal package. It reduces field arguments before the carton is even opened.
Installation Tips and Field Best Practices
A split grounding bushing goes in fast when the prep work is right. It turns into a callback when the installer rushes the fit check or treats the lug like an afterthought.
A clean field sequence
Start with safe work practice. De-energize where required, verify the condition of the equipment, and make sure you have room to work at the raceway end. Split fittings are often used where access is already tight, so don't skip the layout check.
Then install in this order:
Verify the raceway and fitting match. Confirm trade size, conduit type, and lug range before opening the package.
Inspect the raceway end. If the conduit end is damaged, out of round, or rough, fix that first. The bushing won't correct bad pipe prep.
Place the split body around the conductors and onto the raceway. Make sure both halves seat correctly.
Secure the fitting fully. The insulated throat should sit where it protects the conductor entry, not half engaged or cocked to one side.
Land the bonding conductor in the lug. Use the correct conductor for the lug range and terminate it cleanly.
Complete your final checks. Look at mechanical fit, throat position, bonding path continuity, and enclosure connection.
What goes wrong most often
The most common problem is ordering the wrong size. Right behind that is using a fitting with the wrong lug range. Third is poor seating of the split body, where one side looks closed but the throat isn't really protecting the conductor entry the way it should.
Other misses show up in the bonding jumper installation:
Loose planning: The crew has the right bushing but no conductor that matches the lug.
Bad access choices: The lug ends up oriented where it can't be landed properly.
Half-finished bonding: The bushing is installed, but the enclosure bond isn't completed as intended.
Inspection surprises: The fitting is physically on the job, but the listing or application match can't be shown.
Why the split design saves real time
On occupied facilities and maintenance work, the split feature keeps crews from reopening terminations and disturbing feeders that are already dressed and landed. That's the whole advantage. If the fitting avoids a repull and still gives you the required bonding and insulation protection, it has done its job.
The mistake is thinking the split design excuses sloppy verification. It doesn't. It just changes the installation sequence in your favor.
Quick Reference Lookup and Cross References and Procurement Support
When you're buying or approving a split grounding bushing, speed matters, but detail matters more. The part has to fit the raceway, accept the bonding conductor, and arrive with the right listing trail for the job file.
Fast glossary for field and purchasing teams
Grounding bushing: A fitting used to provide a bonding connection at a raceway termination, often with an insulated throat for conductor protection.
Bonding jumper: The conductor that ties the fitting or raceway into the required bonding path.
Insulated throat: The protective insulating surface at the raceway entry that helps prevent conductor insulation damage.
RMC: Rigid Metal Conduit.
IMC: Intermediate Metal Conduit.
Cross references worth checking on the same takeoff
A split grounding bushing rarely stands alone in a submittal. Depending on the termination detail, you may also need to review bonding locknuts, grounding locknuts, hubs, locknuts, bushings, and enclosure accessories that support the same raceway entry condition.
That's also where one body mention is appropriate. ATEK Distribution can support sourcing and submittal review for electrical fittings and related conduit termination hardware when contractors or procurement teams need help verifying listing coverage, material compatibility, or hard-to-find sizes.
Submittal checklist that prevents bad approvals
Listing coverage: Verify the fitting is identified under the standards and literature required for the application.
Trade size match: Confirm the exact raceway size, not just a generic conduit range.
Conduit type match: Check whether the fitting is intended for threaded RMC, IMC, or another system.
Lug range: Make sure the bonding conductor you intend to use fits the lug.
Supplemental listing marks: Review whether the product literature shows items commonly referenced in submittals such as NEMA FB-1, Federal Specification A-A-50553, and cULus when those matter to the project, as noted in the manufacturer literature discussed earlier.
Material fit for environment: Match zinc die-cast or stainless construction to the job conditions.
Documentation quality: Don't approve off a one-line catalog description if the application is sensitive.
If you treat a split grounding bushing like a commodity, you'll eventually buy the wrong one. If you treat it like a retrofit bonding solution, you'll ask the right questions before the order leaves the warehouse.
If you're trying to match a split grounding bushing to an inspection correction, a service raceway, or a hard-to-source conduit fitting package, ATEK Distribution can help review the requirement, verify the fit, and support the procurement side with compliance documentation and sourcing options. That's especially useful when the job can't afford a wrong submittal or a second trip just to replace a small but critical fitting.
Push-In Connectors vs Wire Nuts: Which Should You Use?
A practical comparison of push-in wire connectors and twist-on wire nuts for electricians and contractors: conductor types, code compliance, reliability, box space, labor and cost.
ABy ATEK Distribution Technical TeamUpdated 13 min readCode references: NEC 110.3(B), 110.14, 314.16
Buying connectors in bulk?
Push-in, twist-on and lever connectors in contractor quantities, matched to your conductor schedule.
Push-in connectors are faster to install and easier to inspect than wire nuts, and they are the better choice for solid copper conductors in crowded boxes. Wire nuts cost less per splice, handle a wider mix of wire sizes and stranded conductors, and remain the safer default when you are joining unlike conductors or fixture leads. Both are UL-listed splicing connectors, and both meet the NEC when you install them within their listing.
Key takeaways
Solid copper in a crowded box: push-in connectors are faster and more consistent.
Stranded wire, fixture leads or mixed sizes: use wire nuts, or lever connectors listed for stranded wire.
Both are tested to UL 486C. Code compliance depends on staying inside the listing (NEC 110.3(B)).
Connectors do not count toward box fill under NEC 314.16.
Aluminum needs a connector marked for aluminum. Standard push-ins and wire nuts are copper only.
This guide from ATEK Distribution compares push-in connectors and wire nuts on the points that decide a real installation: conductor type, speed, reliability, reuse, box space and cost. If you are also weighing lever connectors, see our WAGO vs wire nuts vs Ideal comparison. That article covers lever nuts. This one covers push-in connectors only.
Push-In Connectors vs Wire Nuts at a Glance
Push-in connectors vs twist-on wire nuts
Factor
Push-in connectors
Twist-on wire nuts
How it grips the wire
Internal spring clamp presses the conductor against a metal contact bar
Tapered metal coil threads onto the twisted conductors
Install method
Strip to the gauge, push straight in
Strip, hold conductors together, twist until tight
Solid copper
Yes, what they are designed for
Yes
Stranded wire
Limited. Many models are solid-only; some accept stranded. Check the listing
Yes, including solid-to-stranded combinations within the listed range
Visual check
Clear housings on many models show the wire seated
No. You rely on technique and a tug test
Skill dependence
Low. Correct strip length is the main variable
Higher. Pre-twist, torque and conductor alignment all matter
Reuse
Usually single-use or limited reuse (per manufacturer)
Generally treated as single-use once removed
Size in the box
Compact, flat, stack neatly
Bulkier, especially larger sizes
Cost per splice
Higher
Lower
Standard
UL 486C (splicing wire connectors)
UL 486C (splicing wire connectors)
Swipe the table sideways to see every column.
Which Connector Should You Use? A 30-Second Decision Guide
Work down the list and stop at the first question that applies to your splice:
1. Are any conductors aluminum?
→
Connector marked for aluminumNever a standard copper-only connector
2. Is it a damp, wet or underground splice?
→
Sealed, gel-filled connectorListed for the location (UL 486D)
3. Will the connection be reopened often?
→
Lever connectorDesigned to open and close
4. Stranded wire, fixture leads or mixed sizes?
→
Twist-on wire nutWithin the combinations on the package
5. Solid copper, especially in a crowded box?
→
Push-in connectorFastest, most consistent, easy to inspect
What Is a Push-In Wire Connector?
A push-in wire connector is a small splicing connector with one port per conductor. Inside each port, a spring clamp holds the stripped wire against a metal contact bar that links all the ports together. You strip the conductor to the length marked on the connector, push it in until it stops, and the connection is made. Common examples include the WAGO 2773 series and the Ideal In-Sure line.
Push-in connectors come in 2, 3, 4, 5 and 8-port versions. Because each wire has its own port, you can add or check one conductor without disturbing the others.
What Is a Wire Nut?
A wire nut, also called a twist-on wire connector, is a plastic shell with a tapered metal spring coil inside. You hold the stripped conductors side by side and twist the nut clockwise. The coil draws the conductors together and holds them under pressure. Wire nuts have been the standard splice in North American building wire for decades, and most electricians can install them quickly and reliably.
Wire nut sizes are color-coded, but the color for a given wire range is set by each manufacturer. Always read the conductor combinations printed on the packaging rather than going by color alone.
Push-In vs Wire Nuts: The Key Differences
1. Conductor type: solid vs stranded
This is the most important difference. Push-in connectors are built around solid copper conductors. A stranded wire can splay when pushed into the port, and some strands may not seat under the clamp. Some push-in models are listed for certain stranded conductors, but many are not. If the listing does not name stranded wire, do not use it on stranded wire.
Wire nuts handle stranded conductors, and they handle solid-to-stranded combinations such as a solid branch-circuit conductor joined to a stranded fixture lead, as long as the combination is on the manufacturer’s chart. For light fixtures, ceiling fans and many appliances with stranded pigtails, wire nuts or lever connectors are usually the better fit.
2. Installation speed and consistency
Push-in connectors are faster in most boxes. There is no pre-twisting and no judging how tight is tight enough. The result is also more consistent across a crew, because the spring sets the contact force rather than the installer’s hand. On large jobs with hundreds of device boxes, that consistency matters as much as the time saved.
Wire nuts take slightly longer per splice, and quality depends more on the person installing them. A well-made wire nut splice is very reliable. A rushed one, with one conductor sitting short of the others, is one of the most common causes of loose connections found during service calls.
3. Inspection and troubleshooting
Many push-in connectors have transparent housings, so you or an inspector can see that each conductor is fully seated. Some also include a test port for a meter probe. With a wire nut you cannot see inside the splice, so the check is a firm tug on each conductor after installation.
4. Reuse and removal
Neither type is designed for repeated reconnection. Some push-in connectors allow removal with a twist-and-pull motion, and the manufacturer may permit limited reuse. Others are single-use. Wire nuts can be unscrewed, but once the spring has been loaded and the conductors disturbed, the practical rule is to re-strip the conductors and use a new connector. If you expect to reopen a connection often, for example in control panels or fixture change-outs, a lever connector is the better tool.
5. Box space
Push-in connectors are smaller and flatter than most wire nuts, so crowded device boxes are easier to close. Box-fill calculations under NEC 314.16 count conductors, clamps, support fittings, devices and equipment grounding conductors, not the splicing connectors themselves. Push-ins do not change the calculated fill. They do leave more physical room for the device and folded conductors, which reduces strain on terminations. For deep and extra-capacity boxes, see our electrical boxes range.
6. Cost
Wire nuts cost less per splice. Push-in connectors cost more per unit, but can lower total installed cost on labor-heavy jobs. For a contractor, the right comparison is material plus labor per box, not material alone. ATEK can quote both in contractor quantities so you can run that comparison on your own job.
Are Push-In Connectors as Safe as Wire Nuts?
Yes, when they are used within their listing. Both push-in connectors and twist-on wire nuts are tested to UL 486C, the standard for splicing wire connectors. Problems with either type almost always come from use outside the listing, such as stranded wire in a solid-only push-in, the wrong strip length, conductor combinations not on the chart, or aluminum conductors in a copper-only connector.
The NEC requirements that apply are the same for both:
NEC 110.3(B): install listed equipment according to its listing and instructions, which includes the wire range and conductor type printed on the packaging.
NEC 110.14: terminations and splices must be identified for the conductor material, and conductors of dissimilar metals must not be mixed unless the connector is identified for it.
NEC 300.14: leave enough free conductor at each box (generally at least 6 inches) for splicing and future work.
i
Code sections are cited from the NEC as published. Confirm the edition your jurisdiction enforces. Minnesota adopted the 2026 NEC on August 17, 2026; see our Minnesota 2026 NEC changes summary.
Push-In Connectors vs Backstab Receptacles: Not the Same Thing
Many people searching “push-in vs wire nuts” are really thinking about backstabbed receptacles, where the conductor is pushed into a hole in the back of an outlet. That is a device terminal, not a splicing connector. Backstab terminals on many receptacles accept only 14 AWG solid copper, and many electricians prefer the side screw terminals or back-wire clamp terminals for better contact. Standalone push-in connectors are a different product, listed to a different standard, and should not be judged by backstab experience.
When to Use Push-In Connectors vs Wire Nuts
Choose push-in connectors for
Solid copper, speed and inspection
Solid copper branch-circuit splices in new construction and remodels
Pigtailing devices in crowded boxes
Large residential or commercial jobs where speed and crew consistency reduce labor cost
Work where an inspector or client values a visible, checkable connection
Choose wire nuts for
Stranded leads, mixed sizes and budget
Stranded conductors, and solid-to-stranded splices within the listed combinations
Light fixtures, fans and appliances with stranded leads
Mixed wire sizes outside a push-in connector’s range
Budget-driven work where material cost per splice matters most
For connections you may need to reopen, or for fine-stranded control wiring, choose a lever connector instead. Our guide Are WAGO connectors code approved? explains the listing and code questions for lever types.
Special Cases: Aluminum, Grounding and Wet Locations
Aluminum wire
Standard push-in connectors and standard wire nuts are for copper conductors only. Splicing aluminum branch-circuit wiring, or joining aluminum to copper, requires a connector specifically identified for that use and marked for aluminum, such as an AL/CU-rated twist-on connector or a purpose-built aluminum-to-copper pigtail connector. Check the marking before you buy. Using a copper-only connector on aluminum is a known fire risk, and the U.S. Consumer Product Safety Commission publishes guidance on repairing aluminum branch-circuit wiring.
Equipment grounding conductors
Green twist-on connectors, often with a hole in the tip for a pigtail, are made for splicing equipment grounding conductors. Push-in connectors can also join grounding conductors when the listing allows. Either way, the grounding splice must stay continuous if a device is removed, which is why grounds are pigtailed rather than daisy-chained through device terminals.
Damp, wet and underground splices
Neither a standard push-in connector nor a standard wire nut is made for wet locations or direct burial. Outdoors, in landscape lighting, irrigation controls and underground boxes, use sealed connectors filled with gel or silicone that are listed for the location, typically to UL 486D.
Temperature and voltage ratings
Most general-purpose push-in and twist-on connectors are rated for building-wire voltages, commonly 600 V, with a maximum temperature rating printed on the package. The termination temperature limits in NEC 110.14(C) still apply to the circuit, so the connector rating does not raise the ampacity you may use.
How to Install Push-In Connectors and Wire Nuts Correctly
Installing a push-in connector
De-energize and verifyTurn off the circuit and confirm it is de-energized with a tester.
Check the listingConfirm the conductor size, type (solid or stranded) and material are on the connector’s listing.
Strip to the gaugeStrip the conductor to the length shown by the strip gauge on the connector. Too short leaves poor contact; too long leaves bare copper exposed.
Push straight inKeep the conductor straight and push it firmly into the port until it bottoms out.
Look and tugLook through the housing, if clear, to confirm the conductor is fully seated, then tug each conductor to confirm it is held.
Fold in neatlyFold the conductors into the box without placing strain on the connector.
Installing a twist-on wire nut
Pick the right sizeRead the conductor combinations on the package; do not go by color alone.
Strip and alignStrip to the length on the package and hold the conductors side by side with the ends even.
Twist until tightTwist the connector clockwise until the conductors begin to twist together below it and it will not turn further.
Tug testPull each conductor firmly. If any moves, remove the nut, re-strip and start again with a new connector.
Check for bare copperNo bare conductor should show below the skirt of the connector.
Common Mistakes That Cause Connector Failures
Wrong strip length. Too short and the clamp bites insulation; too long and bare copper sits outside the housing.
Stranded wire in a solid-only push-in. Strands splay and only some make contact.
Going by wire nut color alone. Colors differ between brands; the combination chart is what counts.
One conductor short of the others in a wire nut splice, so it is held by the coil tip only.
Reusing a connector that the manufacturer lists as single-use.
Copper-only connectors on aluminum, or standard connectors in wet locations.
Skipping the tug test on either type.
!
Safety note: always de-energize and verify before splicing. Electrical work is regulated in most jurisdictions and may require a licensed electrician and a permit. This guide is general information, not a substitute for the code edition you work to, the manufacturer’s instructions or your inspector.
Buying Push-In Connectors and Wire Nuts for Your Project
ATEK Distribution is a Minneapolis, Minnesota electrical distributor supplying contractors, facility teams and government buyers nationwide since 2018. We are a certified Service-Disabled Veteran-Owned Small Business (SDVOSB), a GSA contract holder (47QSMS25D00A1) and BBB accredited. We source wire connectors, wire, cords and cable, electrical boxes and fasteners and hardware in contractor quantities, and can match connector types to the conductor schedule on your drawings.
Need connectors for a whole job?
Send quantities and conductor sizes. We respond within one business day.
Push-in connectors are better than wire nuts for solid copper splices in crowded boxes, because they install faster, give a more consistent connection and can be visually checked. Wire nuts are better for stranded wire, fixture leads and mixed conductor sizes. Neither is better in every case. Choose by conductor type first, then by speed and cost.
Are push-in wire connectors code compliant?
Push-in wire connectors are code compliant when they are UL-listed and installed within their listing. The NEC requires listed equipment to be used according to its instructions (110.3(B)) and splices to be identified for the conductor material (110.14). Using a solid-only push-in on stranded wire, or on aluminum, would not comply.
Can you use push-in connectors on stranded wire?
Push-in connectors can be used on stranded wire only if the manufacturer lists that model for stranded conductors. Many push-in models are rated for solid copper only. For stranded wire, the safer choices are wire nuts or lever connectors listed for stranded conductors.
Are push-in connectors reusable?
Push-in connectors are generally not intended for repeated reuse. Some models allow removal with a twist-and-pull and limited reuse per the manufacturer’s instructions; others are single-use. If a connection will be opened regularly, use a lever connector.
Do push-in connectors fail more often than wire nuts?
Push-in connectors do not fail more often than wire nuts when both are installed correctly within their listing. Most failures with either type come from installation errors, such as the wrong strip length, unlisted conductor combinations or stranded wire in a solid-only connector. Push-ins reduce technique-related errors because the spring sets the contact force.
Do wire connectors count toward box fill?
Wire connectors do not count toward box fill under NEC 314.16. The calculation counts conductors, internal clamps, support fittings, devices and equipment grounding conductors. Smaller push-in connectors still help in practice, because they leave more physical room in the box.
Can you use push-in connectors and wire nuts in the same box?
Yes. Nothing in the NEC stops you using push-in connectors on the solid branch-circuit splices and wire nuts on the stranded fixture leads in the same box, as long as each connector is used within its own listing. Many electricians do exactly that.
Can push-in connectors be used on 12 AWG and 20-amp circuits?
Yes, if 12 AWG is inside the connector’s listed wire range, which it is for most general-purpose push-in connectors. The connector must also be rated for the circuit voltage. Check the wire range and conductor count printed on the package before you use it.
References and Standards
NFPA 70, National Electrical Code: 110.3(B), 110.14, 300.14 and 314.16. nfpa.org
UL 486C, Splicing Wire Connectors.
UL 486D, Sealed Wire Connector Systems.
U.S. Consumer Product Safety Commission, guidance on repairing aluminum wiring. cpsc.gov
Manufacturer instructions and listings for the specific connector, including wire range, conductor type and reuse limits.
A
About the ATEK Distribution Technical Team
ATEK Distribution is a veteran-owned electrical supply distributor in Minneapolis, Minnesota, supplying contractors, facility teams and government buyers since 2018. Our team sources wire, connectors, boxes and distribution equipment for commercial, industrial and federal projects every day.
Last reviewed September 29, 2026. Found an error? Tell us and we will correct it.
Keep reading
Related Electrical Guides
Connectors
WAGO vs Wire Nuts vs Ideal
Lever connectors compared with twist-on wire nuts on vibration, code compliance, cost and reuse.
Send your quantities and conductor sizes, or the conductor schedule from your drawings. We quote push-in, twist-on and lever connectors side by side and respond within one business day.
Plug Fuses, Type S Fuses and Cartridge Fuse Rules: An NEC Article 240 Guide
What the NEC says about Edison-base and Type S plug fuses, cartridge fuse marking and UL fuse classes, explained in plain English for electricians, apprentices, inspectors and facility maintenance teams.
ABy ATEK Distribution Technical TeamUpdated 16 min readCode references: 2023 NEC
Need fuses or holders?
Plug, cartridge and Class J, RK1, T and CC fuses, plus fuse blocks and holders, quoted in one reply.
Plug fuses are screw-in fuses rated 125 volts or less and 30 amperes or less. There are two types: Edison-base plug fuses, which the NEC permits only as replacements in existing installations, and Type S plug fuses, which use a size-rejecting adapter so a larger fuse cannot be installed on a smaller circuit. Cartridge fuses cover everything above that, from fractions of an ampere up to 6,000 amperes.
Key takeaways
Plug fuses are limited to 125 V between conductors (150 V to ground) and 30 A (NEC 240.50, 240.51).
Edison-base fuses are replacement only; Type S fuses come in three classes: 0–15 A, 16–20 A and 21–30 A.
Size Type S adapters to the conductor: 14 AWG = 15 A, 12 AWG = 20 A, 10 AWG = 30 A.
A cartridge fuse with no marked interrupting rating is rated 10,000 A (240.60(C)).
Dual-element fuses are time-delay fuses, sized up to 175% of motor full-load current (Table 430.52).
This guide from ATEK Distribution explains the NEC Article 240 rules for plug fuses and cartridge fuses in plain English. It is written for electricians, apprentices studying for licensing exams, inspectors and facility maintenance teams. For a broader overview of fuse formats, start with our types of fuses guide. For specifying industrial UL fuse classes, see the industrial fuse selection guide.
i
Which code edition? Section numbers here are from the 2023 NEC (NFPA 70). Article 240 numbering for plug and cartridge fuses has been stable across recent editions, but always confirm against the edition your jurisdiction enforces. Minnesota adopted the 2026 NEC on August 17, 2026; see our Minnesota 2026 NEC summary.
Plug Fuses and Cartridge Fuses at a Glance
Plug fuses vs cartridge fuses under NEC Article 240
Rule
Plug fuses
Cartridge fuses
NEC sections
240.50 to 240.54
240.60 and 240.61
Maximum voltage
125 V between conductors, or 150 V to ground on a grounded-neutral system
Per the fuse voltage rating (common ratings 250 V and 600 V)
Ampere range
0 to 30 A
0 to 6,000 A
Types
Edison-base and Type S
Ferrule and knife-blade bodies, in UL classes such as CC, G, H, J, K, L, R and T
Rejection feature
Type S adapters reject larger ampere classes
Class R, J, T, CC, G and L fuseholders reject non-matching fuses
Replacement-only type
Edison-base
Renewable Class H
Swipe the table sideways to see every column.
What Is a Plug Fuse?
A plug fuse is a fuse with a threaded screw base, similar to a light bulb base, that screws into a fuseholder. Plug fuses were the standard overcurrent protection in older residential fuse panels, and they are still found in many existing homes and small buildings. A plug fuse is typically used to protect a branch circuit.
NEC 240.50 sets the general rules for all plug fuses:
Voltage limit (240.50(A)): plug fuses are permitted only in circuits that do not exceed 125 volts between conductors, or in circuits supplied by a system with a grounded neutral point where the line-to-neutral voltage does not exceed 150 volts. In short, plug fuses are never permitted in circuits exceeding 150 volts to ground.
Marking (240.50(B)): each fuse, fuseholder and adapter must be marked with its ampere rating.
Hexagonal shape (240.50(C)): plug fuses rated 15 amperes and below must have a hexagonal window, cap or other prominent part so they can be told apart from higher ratings.
No exposed live parts (240.50(D)): plug fuses and fuseholders must not have exposed energized parts once the fuse is installed.
Screw shell on the load side (240.50(E)): the screw shell of the fuseholder must be connected to the load side of the circuit.
Fuses under NEC Article 240
240.50 to 240.54
Plug fuses · 125 V, 0–30 A
Edison-base: lamp-style thread, replacement only
Type S: size-rejecting base, 3 ampere classes
Speed: fast-acting or time-delay versions of both
240.60 and 240.61
Cartridge fuses · up to 6,000 A
Ferrule: cylindrical, typically up to 60 A
Knife-blade: bolt or clip-in, 61 A and above
UL classes: CC, G, H, J, K, L, R, T and CF
The Two Types of Plug Fuses
Edison-base plug fuses
An Edison-base plug fuse uses the standard screw base, the same thread as an ordinary lamp. Because every Edison-base fuse fits every Edison-base fuseholder, a 30-ampere fuse can be screwed into a socket protecting 14 AWG wire. That is overfusing, and it is a fire risk. For that reason the NEC restricts them:
Classification (240.51(A)): Edison-base fuses are classified at not over 125 volts and 30 amperes and below. The highest current rating of an Edison-base plug fuse is 30 amperes.
Replacement only (240.51(B)): Edison-base fuses may be used only as replacements in existing installations where there is no evidence of overfusing or tampering.
Fuseholders (240.52): Edison-base fuseholders may be installed only where they are made to accept Type S fuses by the use of adapters.
Type S plug fuses
A Type S fuse is a plug-type fuse designed to stop overfusing. Each Type S fuse has a base sized to its ampere class, and it only fits a matching adapter. Once an adapter is screwed into an Edison-base fuseholder, it locks in place, and that socket will then accept only Type S fuses of the correct class.
Classification (240.53(A)): Type S fuses are classified at not over 125 volts and in three ampere classes: 0 to 15 A, 16 to 20 A, and 21 to 30 A. Type S fuses are therefore available up to 30 amperes.
Noninterchangeable (240.53(B)): a Type S fuse of one ampere class cannot be used in a fuseholder or adapter for a lower class, and Type S fuses cannot be used in any holder other than a Type S holder or an Edison-base holder fitted with a Type S adapter.
Adapters (240.54): Type S adapters must fit Edison-base fuseholders, must be non-removable once installed, must be designed to be difficult to tamper with, and must have standardized dimensions so fuses and adapters from different manufacturers are interchangeable.
Class 0–15 A
15 A
14 AWG copper
General lighting and receptacle circuits. Hexagonal window or cap required at 15 A and below.
Class 16–20 A
20 A
12 AWG copper
Kitchen, laundry and bathroom receptacle circuits and heavier general loads.
Class 21–30 A
30 A
10 AWG copper
Dedicated 120 V appliance circuits. The top of the plug fuse range.
✓
Practical takeaway: when you find an Edison-base fuse panel in an existing building, fit Type S adapters sized to the conductor, not to the fuse that happens to be in the socket. For 14 AWG copper use the 15-ampere class, for 12 AWG the 20-ampere class, and for 10 AWG the 30-ampere class, in line with the small-conductor limits in NEC 240.4(D).
Time-delay vs fast-acting plug fuses
Both Edison-base and Type S plug fuses are made in two speeds. Fast-acting (non-time-delay) plug fuses open quickly on any significant overcurrent and suit resistive loads such as lighting and heating. Time-delay (dual-element) plug fuses ride through the brief inrush when a motor starts, so a refrigerator, furnace blower, well pump or window air conditioner does not blow the fuse every time it cycles on, while still opening fast on a short circuit.
If a circuit with a motor load keeps blowing a correctly sized fast-acting fuse at start-up, the fix is a time-delay fuse of the same rating, never a larger fuse.
How to Install a Type S Fuse Adapter
Converting an Edison-base socket to Type S is the single most effective safety fix in an old fuse panel. It takes a few minutes per circuit:
Turn off the powerSwitch off the main disconnect or pull the main fuse block, and confirm the circuit is de-energized with a tester rated for the voltage.
Identify the conductor sizeCheck the wire gauge on the circuit, not the fuse that is currently fitted. The conductor sets the maximum rating.
Choose the matching adapter classUse a 15 A class adapter for 14 AWG copper, 20 A for 12 AWG and 30 A for 10 AWG, per the small-conductor limits in NEC 240.4(D).
Screw the adapter into the socketThread the Type S adapter fully into the Edison-base fuseholder. It locks in place and cannot be removed, so double-check the size first.
Install a Type S fuse of the same classScrew in a Type S fuse rated for the circuit. A time-delay Type S fuse suits circuits with motor loads, such as a furnace blower or sump pump.
Restore power and verifyTurn the main back on, confirm the circuit works and label the panel directory with the circuit and fuse rating.
!
Safety note: work inside a fuse panel only with the power off and verified. Panel work is regulated in most jurisdictions and may require a licensed electrician and a permit. This guide is general information, not a substitute for the code edition you work to or your inspector.
How to Tell If a Plug Fuse Is Blown, and Why
Most plug fuses have a clear window over the fusible link, and the window tells you what happened:
What the fuse window tells you
What you see
Likely cause
What to do
Clear window, link broken or melted in one spot
Overload: too much load on the circuit for too long
Reduce the load or move it to another circuit, then replace with the same rating
Blackened or discolored window
Short circuit or ground fault
Find and repair the fault before replacing the fuse
Link intact, but circuit dead
Loose fuse, corroded socket or a fault elsewhere
Test with a meter; check socket condition and connections
Blows every time a motor starts
Fast-acting fuse on a motor load
Use a time-delay fuse of the same rating
Swipe the table sideways to see every column.
Signs of overfusing or tampering, which under NEC 240.51(B) mean Edison-base fuses can no longer simply be replaced:
A fuse rated higher than the conductor allows, such as a 25 A or 30 A fuse on 14 AWG wire
A coin, foil or wire placed behind a fuse to bypass it
Scorching, discoloration or melted insulation around a socket
A fuse panel or fuses that are warm to the touch in normal use
Mismatched or unmarked fuses and a missing panel directory
Any of these calls for Type S adapters sized to the conductors, and usually a wider inspection of the panel.
Cartridge Fuse Rules: NEC 240.60 and 240.61
Voltage rules for 300-volt fuses (240.60(A))
Cartridge fuses and fuseholders of the 300-volt type may be used on circuits not exceeding 300 volts between conductors, or on single-phase line-to-neutral circuits supplied from a 3-phase, 4-wire, solidly grounded neutral source where the line-to-neutral voltage does not exceed 300 volts.
Noninterchangeable fuseholders (240.60(B))
Fuseholders must be designed so that it is difficult to insert a fuse of a given class into a fuseholder designed for a lower current or a higher voltage than the fuse. Fuseholders for current-limiting fuses must not accept fuses that are not current-limiting. This is why rejection-style fuseholders exist: a Class R holder, for example, will not accept a non-rejection Class H or K fuse.
Required marking (240.60(C))
Cartridge fuses must be plainly marked with:
Ampere rating
Voltage rating
Interrupting rating, where other than 10,000 amperes
“Current limiting,” where applicable
The manufacturer’s name or trademark
Because the interrupting rating only has to be marked when it is other than 10,000 amperes, an unmarked cartridge fuse should be treated as having a 10,000-ampere interrupting rating. That is also the minimum interrupting rating of a UL branch-circuit cartridge fuse. The interrupting rating marking is not required on fuses used only for supplementary protection.
Renewable fuses (240.60(D))
Class H cartridge fuses of the renewable type, where the fusible link can be replaced, may be used only as replacements in existing installations where there is no evidence of overfusing or tampering. This is the cartridge-fuse equivalent of the Edison-base rule.
Classification (240.61)
Cartridge fuses and fuseholders are classified according to their voltage and amperage ranges. Fuses rated 1,000 volts nominal or less may be used at voltages at or below their rating.
UL Fuse Classes: Quick Reference
Branch-circuit cartridge fuses are listed to the UL 248 series in lettered classes. The table below is a memory aid. For selection guidance, including RK1 versus RK5 and Class J versus Class T, see our industrial fuse selection guide.
UL fuse classes at a glance
Class
Ampere range
Voltage ratings
Interrupting rating
Current-limiting
Plug (Edison / Type S)
0 to 30 A
125 V
10 kA
No
CC
0 to 30 A
600 V
200 kA
Yes
G
0 to 60 A
480 V / 600 V
100 kA
Yes
H
0 to 600 A
250 V / 600 V
10 kA
No
K
0 to 600 A
250 V / 600 V
50 to 200 kA
Not marked current-limiting; fits Class H holders
RK1 / RK5
0 to 600 A
250 V / 600 V
200 kA
Yes
J
0 to 600 A
600 V
200 kA
Yes
T
0 to 1,200 A
300 V / 600 V
200 kA
Yes
L
601 to 6,000 A
600 V
200 kA
Yes
Swipe the table sideways to see every column.
Class CF fuses combine Class J electrical performance with a finger-safe plug-in body. The class is defined by UL 248-17, an Outline of Investigation, and ampere ranges vary by manufacturer. Always confirm ratings on the manufacturer’s data sheet.
Time-Delay, Dual-Element and Non-Time-Delay Fuses
Dual-element fuses are time-delay fuses. They contain two elements in series: an overload element that tolerates short, harmless surges such as motor starting current, and a short-circuit element that opens very fast under fault current. Non-time-delay fuses have a single element and open quickly on any significant overcurrent.
This matters most for motor circuits. NEC Table 430.52 sets the maximum rating of the motor branch-circuit short-circuit and ground-fault protective device as a percentage of motor full-load current:
Maximum rating, % of motor full-load current (NEC Table 430.52)
Protective device
Maximum %
Non-time-delay fuse
300%
Dual-element (time-delay) fuse
175%
Instantaneous-trip breaker
800%
Inverse-time breaker
250%
Percentages apply to most AC polyphase and single-phase motors. Exceptions in 430.52(C) allow the next higher standard size in some cases. Semiconductor (high-speed) fuses are permitted in place of the devices in Table 430.52 for power electronic devices in a solid-state motor controller system, provided the replacement-fuse marking is placed next to the fuses (430.52(C)(5)).
Standard Fuse Ampere Ratings (240.6(A))
The NEC standard ampere ratings for fuses and inverse-time breakers run from 15 A upward to 6,000 A. For fuses only, 1, 3, 6, 10 and 601 amperes are also standard ratings (highlighted below).
1 A
3 A
6 A
10 A
15 A
20 A
25 A
30 A
35 A
40 A
45 A
50 A
60 A
70 A
80 A
90 A
100 A
… up to 6,000 A
601 A
Plug Fuses vs Circuit Breakers
Plug fuses compared with residential circuit breakers
Factor
Plug fuses
Circuit breakers
After a fault
Replace the fuse
Reset the breaker
Overfusing risk
High with Edison-base; controlled with Type S adapters
Low; breaker size is fixed in the panel
Response to a short circuit
Very fast; no moving parts to wear
Fast; mechanism can age over decades
Added protection
Overcurrent only
AFCI, GFCI and dual-function types available
Where you find it
Existing older homes and small buildings
New construction and panel upgrades
Swipe the table sideways to see every column.
A properly fused panel with Type S adapters protects its conductors well. The practical limits are capacity, since many fuse panels were sized for loads far below today’s, and the lack of AFCI and GFCI breaker options that newer codes call for on many circuits. When a panel is replaced, ATEK supplies the circuit breakers and power distribution equipment for the upgrade.
Test Yourself: Common Exam Questions on Plug and Cartridge Fuses
These questions come up often on journeyman and master electrician exams. Try each one before you open the answer.
Q1A Type S fuse is what type of fuse?
A plug fuse.
Q2Type S fuses are available up to what size?
30 amperes, in three classes: 0–15 A, 16–20 A and 21–30 A (240.53(A)).
Q3What is the highest rating of an Edison-base plug fuse?
30 amperes (240.51(A)).
Q4Where may Edison-base plug fuses be used?
Only as replacements in existing installations with no evidence of overfusing or tampering (240.51(B)).
Q5Plug fuses are never permitted in circuits exceeding how many volts to ground?
150 volts (240.50(A)).
Q6What are the two types of plug fuses?
Edison-base and Type S.
Q7Plug fuses of what rating must have a hexagonal window, cap or other prominent part?
15 amperes and below (240.50(C)).
Q8Cartridge fuses are classified according to what?
Voltage and amperage ranges (240.61).
Q9Cartridge fuses are available from 0 amperes up to what rating?
6,000 amperes. Class L covers 601–6,000 A.
Q10What must be marked on a cartridge fuse?
Ampere rating, voltage rating, interrupting rating if not 10,000 A, “current limiting” where applicable, and the manufacturer’s name or trademark (240.60(C)).
Q11Which type of cartridge fuse is allowed only for replacement in existing installations?
Renewable Class H fuses (240.60(D)).
Q12Dual-element fuses are also known as what?
Time-delay fuses.
Always check your exam’s reference edition. Exam boards set questions against a specific NEC year.
Sourcing Fuses, Fuse Blocks and Holders
ATEK Distribution supplies fuses, fuse blocks and fuse holders to contractors, facility maintenance teams and government buyers from Minneapolis, Minnesota, shipping nationwide. We are a certified Service-Disabled Veteran-Owned Small Business (SDVOSB), a GSA contract holder and BBB accredited, and we have supplied electrical projects since 2018, including the VA Health Care EHRM project in Minneapolis. Our supply partners include Mersen, a major fuse manufacturer.
Matching a fuse schedule or upgrading an old panel?
Send the class, ampere rating and quantity. We respond within one business day.
The two types of plug fuses are Edison-base fuses and Type S fuses. Edison-base fuses have a standard lamp-style screw base and fit any Edison-base socket, so they can be overfused. Type S fuses use size-specific bases and adapters that reject a fuse larger than the circuit allows. The NEC permits Edison-base fuses only as replacements in existing installations.
What is a Type S fuse?
A Type S fuse is a tamper-resistant plug fuse rated 125 volts or less in three ampere classes: 0–15 A, 16–20 A and 21–30 A. It fits only a matching Type S fuseholder or an Edison-base fuseholder fitted with a Type S adapter. Once installed, the adapter cannot be removed, which prevents a larger fuse being fitted later.
Can you still use Edison-base plug fuses?
Edison-base plug fuses can still be used, but only as replacements in existing installations where there is no evidence of overfusing or tampering, under NEC 240.51(B). Edison-base fuseholders may be installed only where they are made to accept Type S fuses with adapters (240.52). If you see signs of overfusing, fit Type S adapters sized to the conductor.
What is the maximum voltage for plug fuses?
The maximum voltage for plug fuses is 125 volts between conductors, or 150 volts to ground on a system with a grounded neutral point, under NEC 240.50(A). That makes plug fuses suitable for 120-volt and 120/240-volt single-phase circuits, but not for 277/480-volt systems.
Can I put a 20-amp fuse in a 15-amp circuit?
No. A 20-amp fuse on a circuit wired with 14 AWG copper is overfusing, because NEC 240.4(D) limits 14 AWG copper to 15-amp overcurrent protection. The wire can overheat before the fuse opens. Size the fuse to the conductor, not to the load that keeps blowing it, and fit a 15-amp Type S adapter so a larger fuse cannot be used again.
Can a Type S adapter be removed?
No. Type S adapters are designed to lock into the Edison-base socket and be non-removable once installed, as NEC 240.54 requires. That is what makes them tamper-resistant. If the wrong size adapter was installed, the fuseholder itself has to be replaced.
Are old fuse boxes legal and safe?
An existing fuse panel is not illegal just because it uses fuses, and the NEC does not require a working fuse panel to be replaced. It is safe when every fuse matches its conductor, Type S adapters prevent overfusing and there is no heat damage. Many fuse panels are undersized for modern loads, though, and some insurers and lenders ask for an upgrade, so have a licensed electrician assess it.
What does an unmarked interrupting rating mean on a cartridge fuse?
An unmarked interrupting rating on a cartridge fuse means the fuse is rated 10,000 amperes. NEC 240.60(C) requires the interrupting rating to be marked only when it is other than 10,000 amperes. Where available fault current is higher, you need a fuse with a higher marked rating, such as a Class J, RK1 or T fuse rated 200,000 amperes.
References and Standards
NFPA 70, National Electrical Code, 2023 edition: Article 240 (Overcurrent Protection), 240.4(D), 240.6(A), 240.50 to 240.61; Table 430.52. nfpa.org
UL 248-1, Low-Voltage Fuses, Part 1: General Requirements, and the UL 248 series class standards.
UL 248-11, Low-Voltage Fuses, Part 11: Plug Fuses.
UL 4248 series, Fuseholders.
Manufacturer data sheets for fuse class ratings, time-current curves and let-through data.
A
About the ATEK Distribution Technical Team
ATEK Distribution is a veteran-owned electrical supply distributor in Minneapolis, Minnesota, supplying contractors, facility teams and government buyers since 2018. Our team sources overcurrent protection, distribution equipment and wiring products for commercial, industrial and federal projects every day.
Last reviewed September 29, 2026 against the 2023 NEC. Found an error? Tell us and we will correct it.
Keep reading
Related Electrical Guides
Fuses
Types of Fuses: The Complete Guide
Every fuse family by form, application and speed, with the ratings that drive selection.
Send the fuse class, ampere rating, voltage and quantity, or a fuse schedule from your drawings. We confirm availability and lead time and respond within one business day.
You're on a job where the wiring looked fine at rough-in, but the call-back says otherwise. The cord's been tugged, the jacket is scuffed at the knockout, and now the inspector wants to know why the termination is taking the load instead of the fitting. That's the value of wiring strain relief, it keeps pull, bend, vibration, and impact from reaching the conductors and terminal screws.
A bad field shortcut usually doesn't fail right away. I've seen a 480V motor disconnect where the SOOW cord was looped through the knockout and held with a zip tie on the panel side, then left alone until the first inspection after the equipment had already been in service for months. By then the bend had worked the jacket hard, the copper had darkened, and the enclosure was no longer something an inspector was going to sign off on.
What strain relief actually protects
Wiring strain relief is mechanical protection, not cosmetic support. It keeps the load from being transmitted into the joint, terminal screw, or lug, which is exactly why OSHA 1910.305(g)(2)(iii) and 1926.405(g)(2)(iv) require flexible cords and cables to be connected so strain relief prevents pull from reaching the terminations, and why NFPA 70 Article 400.14 says tension can't be transmitted to joints or terminals. In Europe, DIN EN 62444 replaced DIN EN 50262 in 2014, which matters because it formalized the updated cable gland and strain-relief expectations that inspectors now look for Leviton wire management overview.
Practical rule: if the cable can move the terminal, the strain relief isn't doing its job.
The field failures are usually the same four. The cable pulls out under service load, the jacket gets cut where it enters the enclosure, the edge of the knockout abrades insulation, or repeated motion breaks the conductor at the lug. The right fitting is there to absorb those forces before they become downtime, a red tag, or a repair that turns into a second truck roll.
Strain Relief Types and Where Each One Belongs
The part matters, but the application matters more. A cord grip that works on a portable saw can be a poor fit on a robot arm, and a molded boot that belongs on an OEM cord set will not help a field retrofit unless the assembly was designed around it. The quickest way to narrow the choice is to start with the service: portable cord, fixed machine wiring, control cabinet work, or a factory-built cord set.
The main families you'll see
Type
Best Fit
Typical Cable OD
Weak Spot
Nylon or brass cord grip
SOOW, portable cord, general field wiring
Moderate, depends on body size
Flat festoon cable and severe motion
Metal cable gland
Machine builders, IEC-style panels
Broad, with metric and PG sizing
Ultra-flexible silicone that needs gentler retention
Snap-in or click-out grommet
Indoor control cabinets with low pull load
Smaller jacket ranges
Vibration and repeated movement
Molded PVC or Santoprene boot
Factory cord sets, wet-location appliances, medical equipment
Fixed by assembly design
Poor field retrofit options
Overmolded strain relief
Plugs, connectors, molded assemblies
Built into the connector system
Can't be added after the fact
Cord grips, especially nylon and brass versions, are the workhorse for portable cord and general-purpose equipment. Cable glands fit machine builders and IEC-style enclosures better because the thread system, sealing ring, and compression body are meant to work together. The thread choice matters too, because NPT, PG, and metric bodies do not interchange cleanly in the field.
For enclosure transitions and conduit-adjacent work, buyers often keep a reference like flexible conduit fittings open while they size the entry point. That helps avoid the common mistake of selecting a good cable fitting and a poor enclosure interface.
Grommets are fine when the load is low and the cabinet stays still, but they are not the right answer when vibration is part of the duty cycle. Molded boots and overmolds are more specialized. They work best when they are part of the original design, and they are weak field fixes when someone tries to copy the result with a loose replacement part.
Field selection comes down to the load path. If the cable has to survive repeated flexing, look for a fitting that grips the jacket without crushing it, allows the bend radius the cable can tolerate, and matches the enclosure opening without forcing the cord into a sharp edge. If the job is static, a simpler retention method may be enough. If the job moves, choose for movement first and appearance second.
Codes and Standards That Drive the Selection
A fitting can look right and still fail inspection. On site, the questions are usually simple: is it listed, is it sized for the cable, and does it keep pull force out of the termination? That is why UL 514B, DIN EN 62444, and IPC/WHMA-A-620 matter together, along with the installation rules that govern how the cord enters the equipment.
What each document changes in the buying decision
OSHA 1910.305(g)(2)(iii) and 1926.405(g)(2)(iv) require flexible cords and cables to be connected so strain relief keeps pull from reaching joints or terminal screws, and NFPA 70 Article 400.14 says the same thing in field terms. The purchase decision follows from that: use a listed fitting that controls force at the entry point, instead of a field-fabricated bushing that only fills the opening Leviton wire management overview.
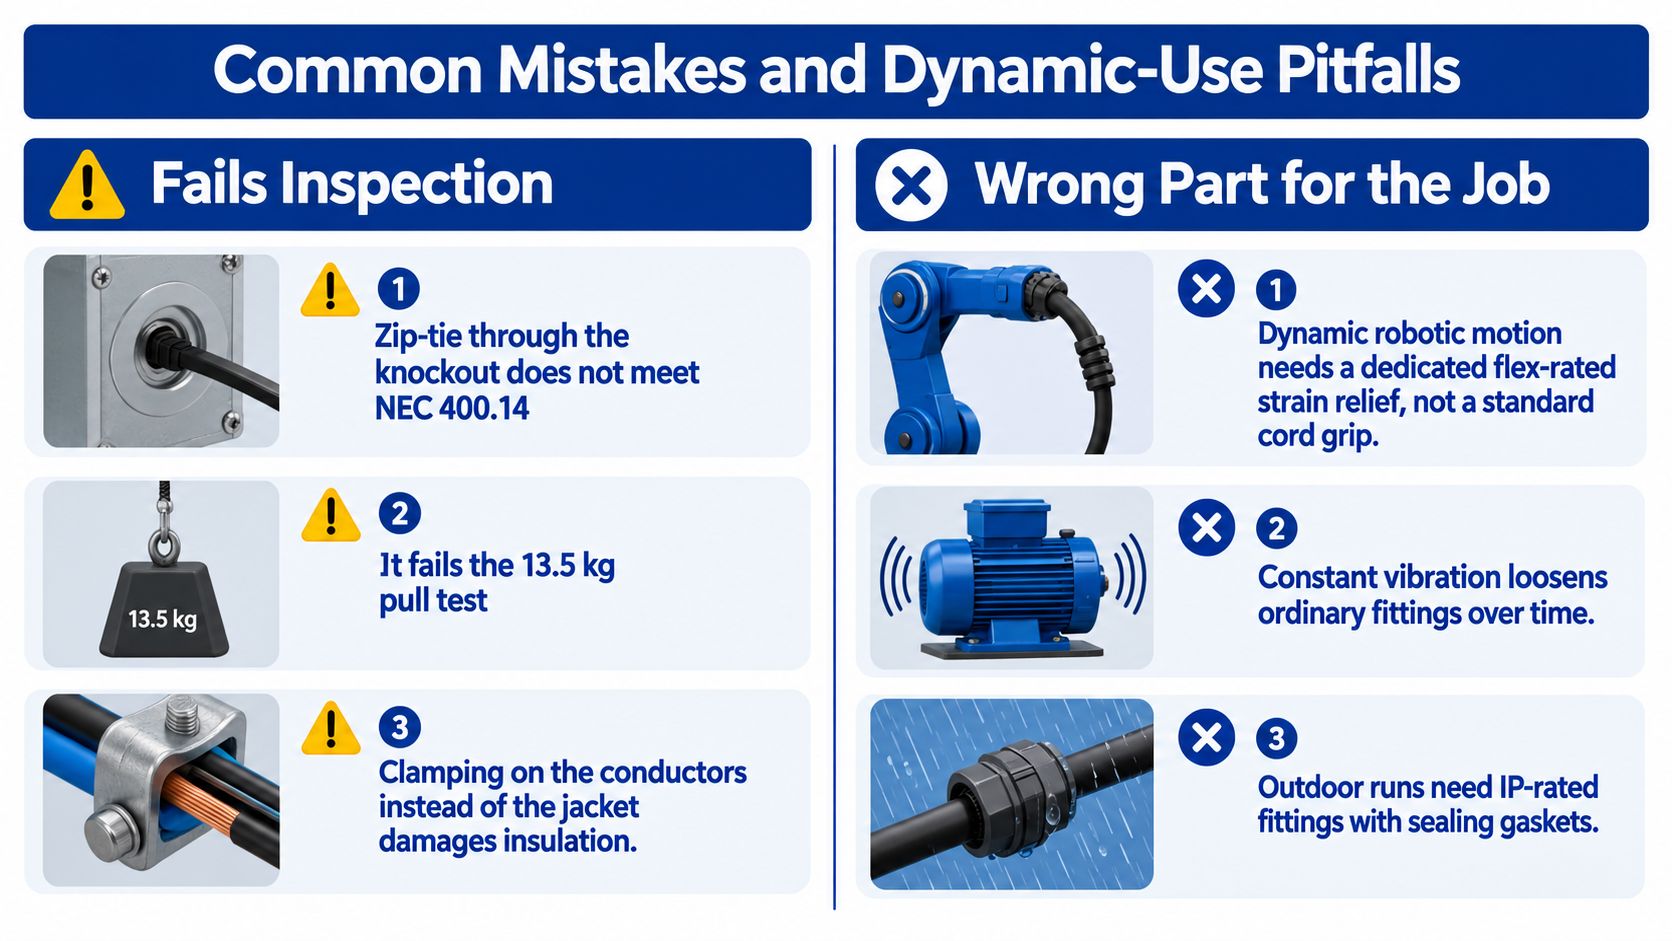
UL 514B is the U.S. fitting standard that matters at the point of installation. The 13.5 kg pull test described in field guidance is the practical verification method. The cable must stay put, and the jacket should show no slipping or obvious damage EDN cable strain relief selection. If the clamp bites the conductors or depends on friction alone, it is the wrong choice.
DIN EN 62444 matters on European machinery and metric installations because it sets the expectations for glands and retention. IPC/WHMA-A-620 sits behind the fitting and defines workmanship for the wire harness or cable assembly itself, so a good cord grip cannot make up for a poor termination.
A strong fitting protects a good termination. A weak fitting can ruin one.
Matching Threads, Materials, and Clamp Range to the Cable
A lot of bad selections happen before anyone looks at the cable. The fitter starts with the wrong knockout, then forces the wrong thread into it, then discovers the cable doesn't fit the clamp range anyway. Good procurement flips that order, first match the enclosure, then the thread system, then the material, and only then the clamp range.
Start with the thread system, not the catalog photo
NPT still dominates many U.S. enclosures, PG survives in legacy European hardware, and metric is the cleanest fit for IEC-style gear and a lot of imported panels. If the thread doesn't match the knockout, you've already created an adapter problem you didn't budget for. The practical rule is simple, match the enclosure hole pattern first, because a pretty gland body won't make a wrong thread work.
Then choose the body material for the environment
Nylon is fine in dry indoor cabinets, nickel-plated brass is a common step up for outdoor or washdown work, stainless 316 belongs in corrosive or food-grade environments, and PVDF is used where chemical exposure is the bigger threat. The material choice affects durability, sealing behavior, and service life, so the low-cost option isn't always the low-risk option. For cable sourcing and related fit-up decisions, buyers often review wire cords and cables alongside the fitting to keep the whole assembly consistent.
Clamp range has to follow cable OD
This is the part people miss. A 1/2" NPT cord grip with a 6 to 12 mm clamp range won't hold a 14 mm SOOW jacket, even if the thread looks right on paper. Put the cable outside diameter in the middle of the range when you can, because that usually gives the best seal and retention without crushing the jacket.
Cable / Enclosure
Thread
Material
Clamp Range
SOOW cord in a U.S. panel
NPT
Nylon or brass
Sized to the measured jacket OD
IEC machine lead in a metric enclosure
Metric
Nickel-plated brass or stainless 316
OD centered in the listed clamp span
Legacy European panel
PG
Brass or nickel-plated brass
Match jacket OD, not nominal cord size
Chemical washdown run
Metric
PVDF or stainless 316
Narrowest span that still centers the cable
Installing Wiring Strain Relief the Right Way
A good installation starts before the fitting is tightened. I have seen sound hardware fail because the installer stripped too much jacket, routed the cable after termination, or treated the clamp like a hole plug. The fitting only does its job when the cable sits on intact jacket and the body carries the retention load.
Confirm the knockout matches the thread, then have the locknut or sealing ring ready. Strip only enough jacket to reach the termination point, feed the cable through the body before landing the conductors, and seat the body against the enclosure wall before you snug the locknut. If the enclosure needs matching hardware, keep it on hand from the start through electrical boxes and accessories.
Torque deserves the same attention. Nylon bodies usually call for less tightening force than brass, and guessing can deform the jacket enough to weaken the grip. Once the body is set, the fitting should hold the cable without depending on terminal-side friction.
Verify the installation, don't assume it passed
Field verification starts with the pull test. As noted earlier, the common UL-style check uses a 13.5 kg load held for 1 minute, then looks for cable slip or jacket damage. The point is simple, the fitting must grip the jacket, not the conductors.
The bend geometry matters too. Keep enough radius for the cable type and duty cycle, since static runs and moving runs do not fail the same way. If the application flexes, add a service loop and clamp the trunk, not individual conductors. For sizing context on cord grips and enclosure fit-up, the same trade-offs are covered in EDN cable strain relief selection, but the installation itself still comes down to clean seating, correct torque, and a jacket that stays intact.
Document the install with a visible torque mark if your inspection process uses one. That gives the crew a fast way to confirm the fitting was tightened and checked, instead of just installed and forgotten.
Common Mistakes and Dynamic-Use Pitfalls
The most common mistakes are usually the ones people defend as “good enough.” A zip tie through the knockout looks tidy for about five minutes, then it starts failing the way the standards said it would, because it doesn't meet the code intent for strain relief and it won't pass a proper pull check. Mismatched threads create a different kind of failure, they may hold long enough to fool a quick inspection, then loosen under vibration or crack when the enclosure moves.
Where standard cord grips stop being the right answer
Ordinary dome-cap glands are fine for static cable. They're not the right choice for robotic tooling, repeated-axis motion, or any application where the cable moves with the machine over and over again. In those cases, the cable needs a flex-rated retention design or a gland built for repeated motion, because ordinary compression on a jacket that keeps bending will fatigue the jacket and the conductors inside.
If the cable already carries its own strain member, like some type W or stage-style assemblies, don't clamp that member the same way you would a simple jacketed cord. The strain member needs its own relief point inside the enclosure, otherwise the gland ends up taking a load it wasn't meant to carry. UV, oil, and heat also punish nylon faster than a lot of crews expect, so outdoor and process environments usually deserve a tougher material selection.
Practical rule: if the machine moves, the strain relief has to be selected for motion, not just for retention.
Procurement Checklist and Common Questions
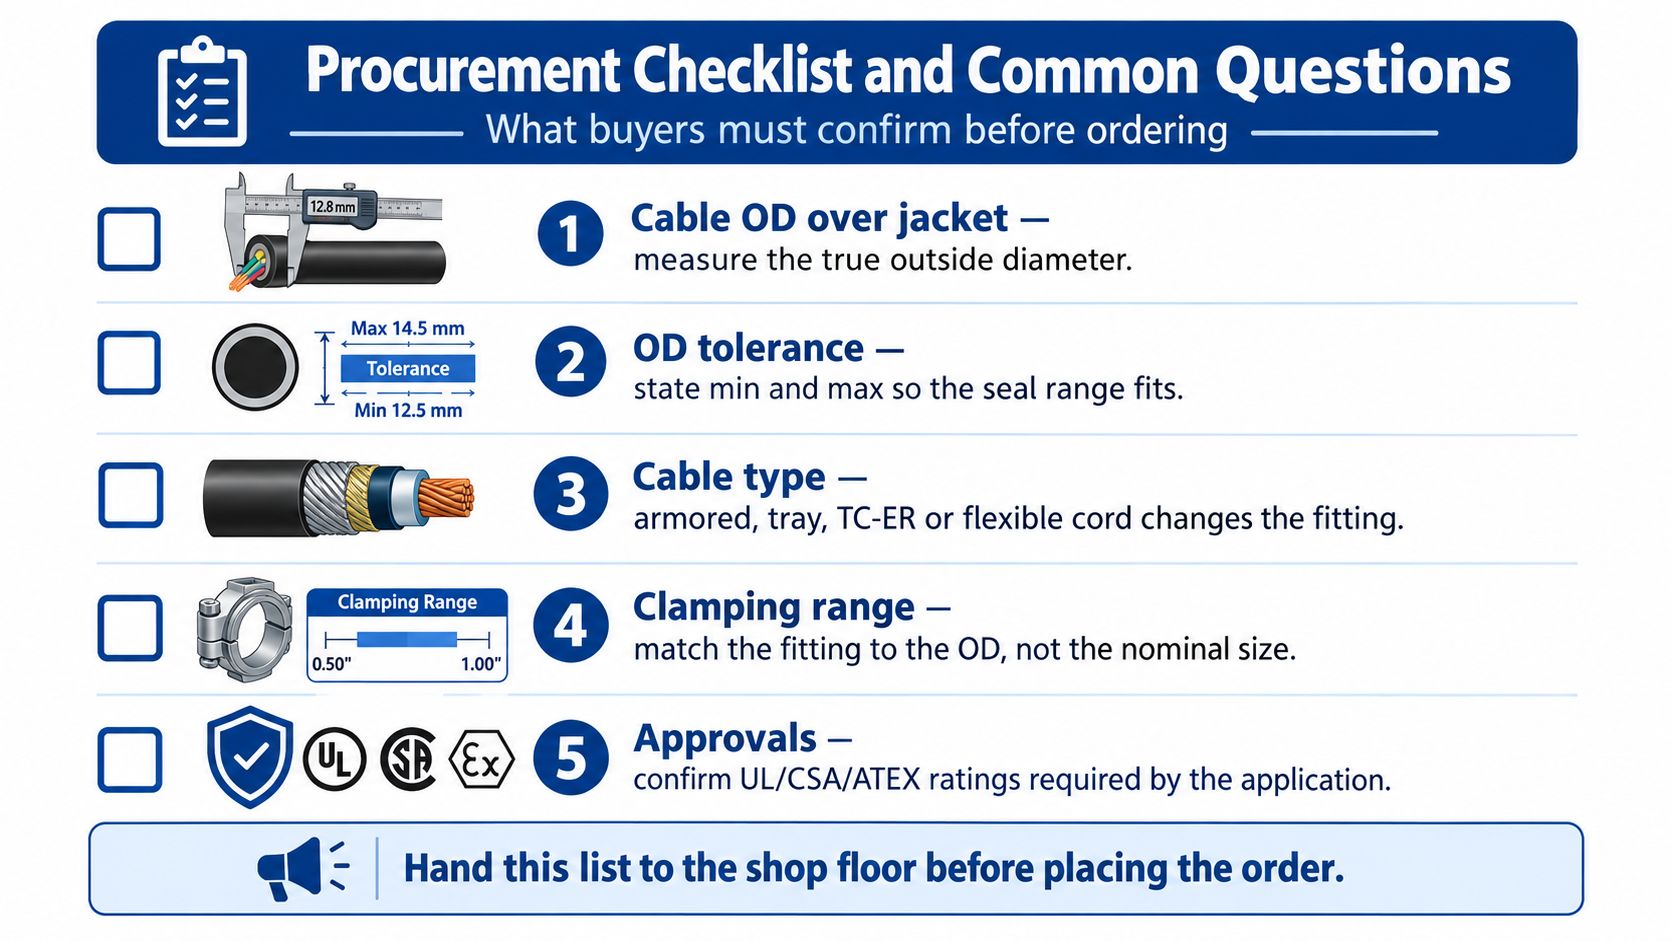
A bad order usually starts with a vague spec. Give purchasing the cable OD measured over the jacket, the thread standard, the enclosure hole size, the material, the indoor or outdoor rating, and whether the run is static or moving. That is the information that keeps the seal, clamp, and enclosure aligned with the job instead of forcing a field workaround.
What buyers should confirm before ordering
Cable OD over jacket: Measure the actual outside diameter, not the catalog name.
OD tolerance: State the minimum and maximum so the clamp range is usable.
Cable type: Armored, tray, TC-ER, and flexible cord all point to different fittings.
Connector thread and hole size: Confirm NPT, PG, or metric before the order goes out.
Approvals and environment: Check the enclosure rating, temperature range, and any UL, CSA, or ATEX requirements.
Common questions from the tech line
When is PG acceptable versus metric versus NPT? PG still belongs on some legacy and imported equipment, and that includes older Siemens-style panels where the hole pattern was built around PG hardware. Metric fits IEC-style panels cleanly, while NPT remains common on North American enclosures. If the thread is wrong, the job usually pays for it with an adapter, extra labor, and another leak point.
Can a standard cord grip hold a moving machine? It can hold the cable in place, but repeated flexing changes the story. Dynamic applications need a fitting rated for motion and a cable built for that duty, because a static grip tightened harder is not the same thing as a motion-rated solution.
What does the inspector want to see? The fitting should be listed for the use, the cable should be retained on the jacket, and the pull check should show no slip or conductor damage. The pull benchmark discussed earlier in the article is the practical reference people use to verify that the clamp is gripping the jacket correctly EDN cable strain relief selection.
If you need strain relief hardware, matching cable support, enclosure accessories, or help sorting through thread systems and compliance requirements, ATEK Distribution can help with sourcing and technical selection. Visit ATEK Distribution to review options and get the right parts lined up before the crew starts pulling cable.
You're at the supply counter with a material list in one hand and a route drawing in the other. The standard and tight-body fittings both say 90 degree elbow, both match the conduit trade size, and both appear suitable for the turn. The choice only becomes clear when you account for the cable pull, available clearance, utility requirements, and the inspection standard governing the job.
A 90 degree elbow conduit fitting redirects a raceway through a right angle while protecting conductors and preserving a usable path for installation. The catalog angle is only the starting point. Material, trade size, bend radius, body length, joining method, and the total bends in the run all affect whether the fitting works in the field.
What a 90 Degree Elbow Conduit Actually Does on a Job
A factory elbow controls more than the direction of a raceway. Its formed curve keeps the opening usable, protects conductors from sharp edges, and gives straight conduit a defined connection at each end. Those details affect whether a pull stays controlled or turns into a struggle at the enclosure.
The buying decision rests on four checks:
Material: Does the system use EMT, rigid metal conduit, IMC, PVC, or another approved raceway?
Radius: Is a standard sweep enough, or does the route require a long sweep or compact short-radius fitting?
Trade size: Does the elbow match the conduit and provide adequate interior space for the conductors?
Application: Will it be installed indoors, underground, outdoors, in a utility duct bank, or in a classified location?
Factory radius is fixed by trade size. It determines the clearance needed inside a panel, pull box, wall cavity, or equipment enclosure, and it affects the force required to pull conductors through the finished route. Exact steel EMT dimensions belong in the sizing table, but the purchasing decision starts here: a catalog angle does not describe how the elbow will behave during installation. Steel EMT elbow dimensions and bend radii
A field-bent 90-degree turn and a factory elbow may both satisfy the basic description, yet they can differ in consistency, clearance, and pulling performance. A utility inspector may also expect the listed fitting, approved joining method, and documented radius specified for the installation. Confirm those requirements before substituting one option for another.
Field rule: Check the material, trade size, published or stamped radius, listing, joining method, and project specification before the fitting reaches the cart.
If the raceway has not been selected, resolve the material first. If conductors must travel through the bend, evaluate the sweep and total route rather than the angle alone. Enclosure clearance and the complete run's bend count require their own checks.
Conduit Elbow Materials and Their Applications
Material selection comes before radius selection because each raceway family brings different mechanical, environmental, and installation requirements. A PVC elbow may be ideal underground but unsuitable where a metallic raceway is specified. An EMT elbow may be efficient above a commercial ceiling but a poor choice in an exposed, high-abuse area.
Steel EMT
Electrical metallic tubing, or EMT, is thin-wall steel tubing joined with setscrew or compression fittings. It's common in commercial interiors because it's relatively light, easy to route, and practical for exposed or concealed installations in permitted environments. Factory EMT elbows provide consistent geometry, but the installer still needs to confirm that the elbow's coupling style matches the straight conduit and the fittings used elsewhere in the run.
RMC and IMC
Rigid metal conduit, often called RMC or GRC, has a heavier wall and threaded connections. It suits locations where the raceway needs greater mechanical protection, including exterior routes, industrial areas, and portions of hazardous-location installations governed by the applicable NEC requirements. Intermediate metal conduit, or IMC, provides a metallic raceway option with less weight than RMC while retaining a threaded system.
Corrosion protection matters as much as wall strength. Galvanized finishes suit many general installations, while aluminum, stainless steel, or PVC-coated steel may be selected where moisture, chemicals, salt, washdown, or process conditions could attack ordinary steel. The exact fitting must be listed and approved for the environment, not merely described as corrosion resistant.
PVC Schedule 40 and Schedule 80
PVC is widely used underground and in corrosive environments because it doesn't rust and can be solvent-welded into a continuous raceway system. Schedule 40 is common where the project provides adequate protection, while Schedule 80 is selected where the installation needs a heavier wall or the specification requires it.
Manufacturer data for PVC Schedule 40 elbows identifies standard-radius 90-degree fittings listed to UL 651, with a 1-inch trade size elbow using a 5.75-inch bend radius. Larger trade sizes use larger geometry, and the fittings are factory formed for solvent-weld joining in the field. PVC Schedule 40 and Schedule 80 elbow data
Light and efficient, but less resistant to severe abuse
RMC or GRC
Article 344
Product-specific rigid metal conduit listings
Outdoor, industrial, exposed, and high-abuse areas
Strong and threaded, but heavier and more labor intensive
IMC
Article 342
Product-specific intermediate metal conduit listings
Industrial and exterior installations
Lighter than RMC, with threaded installation
PVC Schedule 40 or 80
Article 352
UL 651 is typical for listed PVC conduit products
Underground and corrosive environments
Corrosion resistant, but requires compatible solvent-weld installation
Material transitions need deliberate planning. A PVC underground route entering a building may transition to EMT or another metallic raceway, which creates questions about adapters, bonding, grounding, weather sealing, and fitting compatibility. Treat the elbow as part of the complete raceway assembly, not as an isolated plastic or metal curve.
Sweep vs Tight Radius Elbows and Why It Matters for Pulling
The biggest difference between a sweep elbow and a tight-radius elbow appears when conductors move through the finished raceway. A sweep elbow spreads the direction change over a broader curve. A tight-radius elbow saves space, but forces the conductors around a sharper path and can increase friction, pulling tension, and the chance of jacket or insulation damage.
A commonly used NEC-based training guideline places the inside radius of a 90-degree bend at least six times the conduit inside diameter. The purpose is practical. A smoother curve gives conductors a more gradual path and helps keep the conduit from deforming during bending. Conduit bending guidance and bend-radius principles
What works in ordinary routing
For most commercial and industrial raceways, a standard sweep is the safer default. It gives the pulling crew more room to work, reduces abrupt direction changes, and is easier to justify during inspection when the route has adequate space. Long sweeps are particularly useful where the run carries stiff conductors, larger cables, or a cable jacket that can be damaged by excessive sidewall pressure.
A tight-body elbow has a legitimate place. It can solve a clearance problem at a riser, enclosure, panel, or equipment entry where a broad sweep won't fit. The mistake is treating compact geometry as a universal substitute for a sweep. A fitting that fits the drawing may still make the completed pull unnecessarily difficult.
Where utility specifications change the answer
Code compliance is only the minimum threshold on many utility projects. PG&E specifies a 36-inch vertical radius for 2-inch and 3-inch primary conduit 90-degree bends, while some utility closeout specifications require long-sweep bends with a 60-inch minimum radius for changes of direction over 10 degrees. Those specifications may restrict short-radius manufactured elbows to riser applications. PG&E underground conduit requirements
That difference is why a generic product page isn't enough for utility work. Check the owner's standard, approved material list, duct-bank detail, and pull-box geometry before ordering. For a practical comparison of metallic raceway choices, see EMT versus rigid conduit differences.
Practical decision: Use a sweep unless the available space requires a tighter elbow and the project documents expressly permit it. For primary utility routes, follow the utility radius before relying on a general NEC minimum.
Sizing a 90 Degree Conduit Elbow for Your Run
A 90-degree elbow can fit the specified raceway and still fail the job in practice. Select it by trade size, connection method, bend radius, cable space, and the clearance needed to install and pull the run.
Trade size identifies the conduit system and nominal raceway size. Bend radius defines the curve through the elbow, affecting the physical envelope and the force required to move conductors. Start with the conduit specification, not the cable. A 1-inch EMT run requires an elbow made for 1-inch EMT with the correct connection method. An elbow made for PVC, RMC, or another trade size is not interchangeable just because it produces a 90-degree turn.
Use product geometry in the layout
Standard-radius steel EMT product data provides planning dimensions for the elbow centerline:
Use the radius to draw the centerline and outside envelope in the plan or coordination model. Add the radius plus half the conduit outside diameter to the centerline to estimate the outside envelope for clash detection. Check that envelope against panel interiors, box walls, framing, cable tray, access doors, and pull-box entries. The fitting may match the raceway while its body still collides with an enclosure or leaves too little straight length for the connection.
Verify conductors and fill
The elbow remains part of the same raceway system for conduit-fill purposes. Confirm conductor count, conductor dimensions, and available internal area under the applicable NEC requirements. Inspect the elbow's internal bore, particularly at the curve and connection, where a tight passage can increase pulling resistance or damage insulation.
A larger bend radius does not increase the conduit's internal area. If the conductors need more room, choose the correct larger trade size. A sweep can make the path easier without solving an undersized raceway.
Count the whole route
Mark every elbow, offset, kick, and field bend on the route drawing. Record the bend angles and the physical envelope, then verify that the planned pull point remains accessible before releasing material.
For a short interior run, elbow body depth may control the choice. On a long underground route, radius and pulling feasibility usually outweigh compactness. Factory elbows and field-bent alternatives may both qualify as 90-degree bends, yet their geometry can produce very different installation results. Choose the fitting that satisfies trade size, fill, clearance, radius, and project specifications together.
NEC Bend Limits and Compliance Planning for Conduit Runs
A conduit run can be individually correct at every elbow and still be poorly planned as a system. The controlling issue is the combined bend between accessible pull points, not just whether each fitting makes a clean right angle.
The NEC-based limit is 360 degrees between pull points, equivalent to four 90-degree elbows. A pull point may be a junction box, pull box, conduit body, or another permitted access fitting. NEC-based conduit bend-limit guidance
Track bend equivalents during design
A simple route worksheet prevents a common field failure. Start at the first pull point and list each direction change in order. Add the degrees for factory elbows and every component of field-made bends. Stop the count at the next accessible pull point, then begin a new segment.
This matters when a route combines a 90-degree factory elbow with offsets, kicks, or saddles. A run may look like a series of modest adjustments, but the total angle still accumulates. The installer who counts only the obvious 90-degree fittings can miss the contribution of smaller field bends.
Add access before the route becomes expensive
If the planned segment approaches the allowed bend total, add a pull box or conduit body during design rather than after the conduit is installed. The access point must be located where conductors can be pulled and where the box remains accessible under the project requirements.
Radius adds another layer. A route may stay within the total-degree limit while still requiring a larger utility-approved sweep or a different pull-box arrangement. Review bend accumulation, elbow radius, cable characteristics, and owner requirements together.
Planning habit: Put the bend count on the drawing before the first conduit is cut. It's cheaper to revise a route on paper than to add access after conductors are already staged.
Installing a 90 Degree Conduit Elbow Correctly
A factory elbow installs cleanly when the crew treats orientation, alignment, joining, and support as one operation. Rushing any one of those steps can leave a fitting that looks acceptable but creates trouble during the pull or inspection.
Confirm orientation before fastening
Dry-fit the elbow with the adjoining conduit before tightening anything. Check whether the turn is horizontal, vertical, or transitioning between planes. In a panel or equipment enclosure, rotate the elbow until the body clears the enclosure wall and the straight conduit lands without forcing the raceway sideways.
Cut conduit ends square and ream them thoroughly. A sharp edge inside the raceway can damage conductor insulation, while an unreamed end may prevent the conduit from seating fully in a connector or coupling.
Match the joining method to the material
EMT commonly uses either setscrew or compression fittings. Tighten them according to the fitting manufacturer's instructions. Over-torquing a setscrew can deform thin-wall EMT or damage the fitting, while under-tightening can leave the connection mechanically insecure.
RMC and IMC use threaded joints. Keep threads clean, use the specified sealing or corrosion-protection method, and maintain continuity and bonding as required by the installation. PVC uses solvent-weld connections. Clean and prepare the surfaces properly, apply the compatible cement, fully seat the joint, and allow the manufacturer's required set or cure time, especially in cold conditions.
Install supports near changes of direction in accordance with the NEC, manufacturer instructions, and the project specification. The elbow shouldn't carry the weight of an unsupported conduit run or become a lever against a box connector.
Before pulling conductors, inspect the complete interior path. Confirm that the elbow is seated, joints are secure, cut ends are smooth, the raceway is free of debris, and the conductor arrangement remains within permitted fill. A solvent-welded joint that hasn't set, an elbow installed out of plane, or a deformed EMT connection can turn a routine pull into a replacement job.
Use Cases by Application Type and Environment
The same right-angle geometry behaves differently depending on the surroundings, the owner's standard, and the consequences of a failed pull. Select the elbow after identifying the environment and the required raceway system.
Commercial offices and retail
EMT with standard sweep elbows is a practical choice for many indoor commercial routes, particularly above ceilings and in accessible service areas. The priority is usually efficient installation, clean alignment, and a pull path that doesn't punish the conductors. Compression fittings may suit locations exposed to moisture, while setscrew systems are common in dry interiors where permitted.
Industrial plants and manufacturing
Industrial routes often need more mechanical protection than light-wall EMT provides. RMC or IMC may be appropriate in exposed or high-abuse zones, near equipment, and where the raceway could face impact or harsh operating conditions. Use broad sweeps on longer cable routes, and reserve compact elbows for locations such as riser chases only when the design and specification support that choice.
Healthcare and clean environments
Healthcare, laboratory, and cleanroom projects place extra emphasis on cleanable surfaces, corrosion resistance, and predictable installation quality. Stainless steel, PVC-coated steel, or PVC may be selected according to the room classification, cleaning chemicals, moisture exposure, and owner standard. Avoid assuming that a fitting suitable for a general wet location satisfies a healthcare or cleanroom specification.
Underground and site utilities
PVC Schedule 40 or Schedule 80 sweep elbows are common in underground raceway systems, provided the product is listed for the installation and the route meets the project requirements. The elbow must align with duct-bank, encasement, burial, pull-box, and riser details. Solvent-weld preparation and joint setting deserve the same attention as the excavation and bedding.
Utility and primary distribution
Utility work is specification driven. Long-sweep elbows may be required even when a compact fitting appears to meet a general code rule. Review the utility's approved radius, material, riser limitations, pull-box details, and closeout requirements before procurement.
Hazardous and government facilities
Classified locations require listed fittings and raceway methods appropriate to the applicable hazardous-location rules. RMC with compatible listed fittings is frequently considered for these environments, but the classification and project documents control.
Government work can add sourcing and documentation requirements, including domestic-content provisions where applicable. Confirm listing certificates, submittals, approved manufacturers, and any Buy American Act or Trade Agreements Act requirements before ordering.
Quick Reference, Cross-References, and Key Terms
Buyer quick reference
Decision
Practical selection
Main check
Material
EMT, RMC, IMC, or listed PVC
Environment and joining method
Radius
Standard sweep, long sweep, or short radius
Pulling performance and owner specification
Trade size
Match the raceway system
Conduit fill and enclosure clearance
Application
Commercial, industrial, underground, utility, or classified
Listing, inspection, and project requirements
Related components
Conduit bodies: Provide an accessible change of direction and may serve as a pull point where permitted.
Pull boxes: Break up long or heavily bent routes and provide conductor-access space.
Couplings: Join straight conduit sections to elbows or other fittings.
Straps and supports: Hold the raceway in position and reduce stress at direction changes.
Junction boxes: Provide accessible connection or pulling locations when correctly sized and installed.
Key terms
Trade size: The nominal size designation used to identify the conduit system.
Bend radius: The radius of the elbow's curved path.
Sweep elbow: A fitting with a broader curve for easier pulling.
Short-radius elbow: A compact fitting with a sharper curve and tighter clearance needs.
Conduit fill: The amount of conductor area occupying the raceway.
Pull point: An accessible location where conductors can be installed or redirected.
Solvent weld: A PVC joining method that fuses prepared surfaces with compatible cement.
Setscrew fitting: A metallic fitting secured with screws that grip the conduit.
Compression fitting: A fitting that secures conduit through a compression mechanism.
NEC: The National Electrical Code, subject to the adopted edition and local amendments.
ATEK Distribution can help source conduit elbows, bends, couplings, supports, and related raceway components for EMT, PVC, rigid, and IMC systems, including technical documentation and alternate-product review when specifications or availability create a problem. For project-specific sourcing support, visit ATEK Distribution and send the conduit material, trade size, radius, application, and required listing.
Most advice gets the first part wrong. A 400 amp meter can is usually not a true 400 amp continuous device, it's a 320/400 class meter socket that utilities accept as a 400 amp service point, while the continuous rating is commonly 320 amps. If you spec it as if it can carry 400 amps continuously, you can end up with a rejected submittal, a bad field install, or a service that the utility won't energize.
The label 400A is often misinterpreted. In utility practice, a 400 amp meter can is commonly a 320/400 amp class meter socket, which means the hardware may be accepted for 400 amp service without being rated for 400 amps continuous. That distinction matters before you order gear, because the utility, not the catalog title, decides what passes.
Read the rating the way the utility reads it
Skamania County PUD states that for 400-amp service, the required meter base is a Class 320 unit rated 120/240 volts and 320 amps continuous, with 4 jaws and a manual block bypass. It also says any structure needing more than 320 amps of continuous current requires CT metering instead Skamania County PUD guidance.
Practical rule: if the utility sheet says Class 320, spec and buy to that standard, not to the product headline.
That is why contractors have to read the nameplate, the utility service guide, and the approved equipment list together. A socket marked “400A” can still be a 320 continuous device with a 400 amp service rating. Those are not interchangeable terms.
Why the industry uses this convention
Utilities care about thermal limits and metering architecture. A socket can be acceptable for a 400 amp service while the meter element and service rules still cap continuous use at 320 amps. That is why many product listings and utility-approved standards use the same language instead of calling every large socket a true 400 amp continuous meter.
Legacy terminology adds another layer of confusion. A public utility approval document from 2018 says 400 Amp K-base meter socket[s] are no longer approved for several utilities, which shows how older forms were already being phased out by the late 2010s utility approval document.
A contractor who ignores this will often overspec the job and still miss the utility requirement. The safer approach is simple. Treat 400 amp as the service class, verify the continuous rating separately, and confirm the utility-approved configuration before ordering.
Why Continuous Versus Maximum Amperage Matters
A 400 amp meter can is often treated as if it means 400 amps continuous. In practice, the rating split matters more than the label on the cover. Many utility-approved self-contained sockets are sold as 400 amp service equipment while still carrying a 320 amp continuous limit, so the spec has to be checked against the service rules, not just the catalog title.
What changes in the field
That distinction affects load planning, conductor sizing, and protective device coordination. If the connected load will sit near the top of the continuous range for long periods, the utility may require a different metering arrangement instead of a larger-looking socket. Oversizing the can does not automatically increase usable capacity.
Utility acceptance is the decision point, not the catalog title.
Florida Power & Light's metering handbook requires 320-amp self-contained meters for all 400-amp services and prohibits K-base bolt-in meters, which is why the meter style matters as much as the socket body Florida Power & Light metering handbook. If the wrong configuration is ordered, the install can still fail review even when the rest of the work is clean.
Match the socket to the load profile
Contractors need to work from actual demand, not just service size. A large house, a light-commercial suite, or a mixed-load building may fit a 320A continuous / 400A class setup. Heavier or more sustained loading can push the project toward transformer-rated metering instead of a self-contained can.
Breaker selection belongs in the same review. Meter rating and overcurrent protection have to agree, especially when the service is split across panels or load centers. For a practical check on upstream protection choices, see circuit breaker selection considerations.
Self-Contained Versus CT Metering Options
A lot of 400 amp calls get misread at the start. The label sounds like a physical size, but the core decision is whether the utility will accept a self-contained meter socket or require CT metering. That distinction matters because a 400 amp service often sits in the gray zone where the hardware title, the continuous rating, and the utility breakpoint do not mean the same thing.
Side-by-side differences that matter
A published utility detail from Lehi shows approximate enclosure dimensions of 5 in. D x 13 in. W x 19 in. H for an overhead-service meter socket up to 400 A, with concentric knockouts, utility-approved hub sizes from 1-1/4 in. to 2-1/2 in., and bypass required Lehi utility detail. That gives contractors a clear boundary, the self-contained option is a defined utility assembly, not a generic cabinet that can be adapted later.
The same detail says any service over 400 A must shift to current-transformer metering in factory-built CT cabinets or compartments, with NEMA 3R weather rating, installed ahead of the main disconnect unless the utility approves another arrangement Lehi utility detail. Once a project crosses that breakpoint, specifying a larger-looking socket does not solve the metering requirement.
How to choose the right architecture
Use self-contained gear only when the utility allows it and the load fits the accepted class. A house, a small commercial suite, or another moderate service may stay in that range, but a heavier or more sustained load can push the job into CT metering even if the service number still sounds like a “400 amp” job.
Load profile drives the decision as much as service size. A project with panels split across multiple load centers, or one with sustained high demand, needs the metering method and the protective devices reviewed together so the service arrangement stays inside utility rules.
Meter Can Mounting and Physical Specifications
A good 400 amp submittal often fails on geometry, not on theory. The can may be right in electrical terms and still be wrong in the field because the hub size, knockout layout, or weather rating doesn't fit the installation. Product documentation from distributor channels shows how often 400 amp meter can listings are described as 400A, 320 continuous, and sold under overlapping names like 400 amp meter, 320 amp can, 400 amp term can, and meter panRexel product listing.
What to verify before ordering
Start with enclosure type and mounting orientation. Overhead and underground services don't always use the same entry pattern, and a utility-approved can needs to line up with the service route, not the other way around. The wrong knockout placement can force a field modification that no inspector wants to see.
Next, check the weather enclosure and bypass provision. Outdoor meter sockets commonly need NEMA 3R protection, and the utility may expect a manual bypass or a specific ringless or ring-type setup depending on service rules. That's not a cosmetic preference, it's part of the approved configuration.
The submittal should prove fit, not just intent.
Why contractors get tripped up
The terminology is part of the problem. A buyer may ask for a “400 amp meter can,” receive a product marked 400A, and still end up with a 320 continuous device that's perfectly legitimate for the utility but not what the job was mentally modeled around. That gap is why field coordination gets messy.
For outdoor placements, enclosure selection matters as much as electrical rating. A practical reference for weather-exposed gear is how to choose electrical enclosures for outdoor use, because the meter can still has to survive the environment it's installed in.
Ring-Type and Ringless Meter Socket Configurations
Ring-type and ringless sockets solve the same basic job, but they handle utility access differently. The utility's sealing and removal process, the service entrance layout, and the approved equipment list all influence which one belongs on the project. If you pick the wrong style, the rest of the install can be clean and still not meet the utility's preference.
Ring-type sockets use a ring that secures the meter, while ringless designs rely on a different retention method. In practice, the utility's local standard usually decides the issue more than the contractor's preference does. That's why the approved list matters more than the catalog photos.
Choosing based on service design
Overhead and underground services can both use either configuration, depending on utility rules and product approval. The key is terminal compatibility and the service entrance method. If the utility wants a specific jaw arrangement or bypass style, that requirement outranks the general product family.
Contractors should also watch for matching jaw count, phase arrangement, and voltage class. The commonly accepted combinations in utility standards include 120/240 V single-phase and other approved variants, but the exact configuration must match the utility's list. A ringless unit is not automatically better, and a ring-type unit is not automatically older or less capable.
The right move is to spec the configuration the utility already accepts, then confirm that the service conductors and termination points align with that decision. Guessing here creates avoidable delays.
Meter-Main Integration and Future-Proofing
A standalone meter can solve only part of the service problem. Many projects now use meter-main combinations or integrated distribution gear because the service is no longer just feeding lights and receptacles. It also has to support EV charging, all-electric loads, backup-ready layouts, and, in some cases, temporary power or phased expansion.
Product listings and guides tie this category to EV-heavy homes, all-electric buildings, small commercial loads, and construction power Home Depot meter-main combo category. That does not mean every project needs combo gear. It means the buyer should match the hardware to the present load and the likely next step.
Think beyond the meter alone
The choice is between a standalone socket and an integrated assembly. If the install may later need extra disconnects, backup interfaces, or staged load management, meter-main gear can reduce rework. If the service is straightforward and the utility wants a simple self-contained arrangement, a standalone can still be the cleanest option.
I've seen contractors choose for today's load and ignore tomorrow's additions. On electrification-driven jobs, that creates avoidable changes later. The client may not know whether solar, storage, or EV charging will be added next, but the service equipment should leave room for those decisions.
For projects that need metering strategy, utility coordination, and procurement support, ATEK Distribution can source meter sockets and meter centers for commercial, industrial, and government electrical work. Their team also handles technical review and RFQ-based sourcing, which helps when the project needs the right configuration instead of a generic part number.
Quick Reference Selection Guide
The fastest way to avoid a bad order is to match the project type to the utility-approved configuration before you look at price or lead time. A 400 amp meter can is not one universal product. It's a family of configurations that change based on load profile, phase, bypass style, and whether the utility wants self-contained or CT metering.
Selection cues that usually matter
Single-family or light-commercial with standard utility acceptance: A 320/400 class self-contained socket is often the starting point, but only if the utility allows that arrangement.
Higher sustained load or utility breakpoint exceeded: Move toward CT metering rather than forcing a bigger-looking self-contained can.
Overhead service: Confirm hub size, entry orientation, and bypass requirements before you order.
Underground service: Verify the enclosure layout and termination access, not just the amperage label.
Ring-type versus ringless: Use the utility-approved style, not the style that happens to be in stock.
Future add-ons like EV, solar, or storage: Favor a service architecture that won't be ripped out when the load grows.
What to verify on every submittal
Check the amp class, the continuous rating, the jaw count, the voltage, the bypass method, and the enclosure rating. Then confirm that the service architecture matches the utility's metering rules and the site's actual load plan. If any one of those items is unclear, the order isn't ready.
A simple rule keeps projects moving. If the product name says 400A but the utility sheet says Class 320, the utility sheet wins. If the site load exceeds the self-contained threshold, stop treating the can as the answer.
Utility Compliance and Submittal Requirements
A compliant 400 amp submittal starts with the utility-approved list, not the distributor catalog. The utility decides what it will energize, and the inspector checks whether the installed hardware matches that decision. Legacy gear can disappear from approval quickly, so a familiar form is not enough if the utility has moved on.
Build the submittal around the utility file
First, verify that the exact meter socket or CT equipment is on the approved list. Then cross-check the local service standard and any municipal detail sheets. After that, submit the product cut sheet and make sure the ratings on the sheet match the utility's language, not just the seller's shorthand.
Check inspection readiness before the truck rolls. The bypass requirement should be satisfied, the enclosure type should be correct, and the service configuration should match the approved architecture. If the utility wants NEMA 3R or a particular jaw arrangement, that detail belongs in the submittal package, not in a note the reviewer has to hunt for.
The best submittal is the one that answers the utility's question before they ask it.
Avoid the classic documentation failures
The most common failure is a mismatch between the catalog description and the utility's terminology. Another is assuming an old approved form still passes because it looks familiar. Utilities update standards, and field crews do not get to negotiate after the fact.
A K-base example makes the point clearly. A form that was once common can fall out of approval, so the safe move is to verify the current utility sheet before you release the order.
Keep one clean packet for the meter socket, one for the service conductors, and one for the disconnecting means. That makes it easier for the AHJ and the utility to verify the whole service path without sorting through mixed paperwork.
Common Mistakes and Best Practices
The worst mistakes with a 400 amp meter can are simple and expensive. Contractors either buy to the marketing headline, ignore the utility's class language, or assume that a bigger socket automatically means more usable service. None of those shortcuts helps once the utility reviews the job.
What trips jobs up
Buying by product title alone: A listing that says 400A may still be a 320 continuous socket, so the title can't be the only decision point.
Skipping utility verification: If the utility wants Class 320, ringless, or CT metering, that rule controls the job.
Missing bypass requirements: Some service standards require a manual bypass, and leaving it out can kill the submittal.
Using the wrong legacy form: Older K-base equipment may already be out of approval in some jurisdictions.
Ignoring future load growth: EV charging, all-electric equipment, or added distribution can change the right metering architecture later.
What experienced specifiers do differently
They read the utility sheet first, then compare the product cut sheet against it. They confirm the continuous rating separately from the service rating. They also check whether the project belongs in the self-contained category or the CT category before they write the purchase order.
A practical habit is to treat the meter can as part of a system, not a standalone purchase. The socket, the service conductors, the disconnects, and the utility requirements all have to line up. If one piece is off, the whole package slows down.
Contractors who get this right usually save the most time at the review stage, not during installation. The field work becomes routine because the paperwork already matches the hardware.
If you're sourcing a 400 amp meter can, meter-main combo, or related service equipment for a project that needs the right utility-approved configuration, start with ATEK Distribution. They help contractors, engineers, and procurement teams source electrical distribution products and support submittals with technical review, which is exactly the kind of help that keeps a service upgrade from turning into a rework cycle.